Showing posts with label using. Show all posts
Showing posts with label using. Show all posts
Saturday, July 15, 2017
Kali Linux Tutorial How To Brute Force Wordpress Using Wpscan Tool
Kali Linux Tutorial How To Brute Force Wordpress Using Wpscan Tool

As a WordPress administrator or webmaster you are responsible for the security of the WordPress blog or website you manage. Most probably you’ve already done a lot to beef up the security and today we will show you how to brute force Wordpress password in Kali Linux using Wpscan to checking your Password Strength.
Disclaimer: This tutorial is for educational purposes only and we are NOT responsible in any way for how this information is used, use it at your own risk.
As we now WPScan is a black box WordPress vulnerability scanner, and it is installed by default in kali linux we will use it for brute forcing wordpress, If you have no idea about Kali Linux then i recommend you to read this article: An Introduction To Hacker’s OS: Kali Linux Setup Tutorial.
We will use our wordpress platform that we already installed in our kali linux. If you have not already done visit our article: Complete Guide To Setup Wordpress In Kali Linux With Xampp Server .
Letss start,
- Open your Kali Linux Terminal and start Xampp server by typing the following command:
root@kali: /opt/lampp/lampp start
- Now we need to Enumerate users, type in terminal:
root@kali: wpscan -u 127.0.0.1/wordpress --enumerate u

- Wpscan will automatically search the admin username.

- Now Do wordlist password brute force on the username, type in terminal:
root@kali: wpscan --url 127.0.0.1/wordpress --wordlist /root/pass --username k4linux

- --wordlist set the location of your Password Wordlist
- --username set the administrator username that you have found
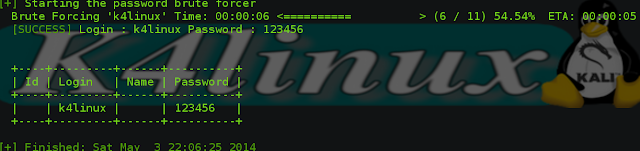
After a search Wpscan will find the password and this will take a few minutes, this depends on your Wordlist.
Efficiency of the Brute Force depend on how much strong is your wordlist and how many password contains it.
Watch the video tutorial for more explanation (Wpscan):
Credits: http://www.k4linux.com/
Recommended Hacking Tutorial:
- How to Hack Website Using Sql Map in Kali Linux - Sql Injection
- Kali Linux Tutorial: Find Vulnerabilities for Any Website Using Nikto
- Heartbleed Attack: Exploiting OpenSSL Vulnerability Using Metasploit
- Kali Linux Tutorial: Hack a Website login Page Password Using Wireshark
Available link for download
Monday, May 15, 2017
Kali Linux Tutorial Finding Exploits Using the Searchsploit Tool
Kali Linux Tutorial Finding Exploits Using the Searchsploit Tool
What is Vulnerability Exploit?
Words like "exploit" and "vulnerability" are tightly bound together. Often, a script/program will exploit a specific vulnerability. Since most vulnerabilities are exploited by script kiddies, the vulnerability is often known by the name of the most popular script that exploits it. In any case, there are broad-spectrum vulnerability scanners/assessment tools that will scan a system and look for common vulnerabilities. These are often used in order to toughen up a computer system.
In computer security, the term vulnerability is applied to a weakness in a system that allows an attacker to violate the integrity of that system. Vulnerabilities may result from weak passwords, software bugs, a computer virus or a script code injection, and a SQL injection.
Introduction
When we are looking for ways to hack a system, we need a specific exploit to take advantage of a certain vulnerability in the operating system, service, or application.
Remember, exploitation is very specific, there is no one silver bullet that will allow you to exploit all systems. You need to find an exploit that will specifically take advantage of a vulnerability in the system that you are attacking. That is where the Exploit Database (www.exploit-db.com) can be so incredibly useful.
EDB is a project of Offensive Security, the same folks who developed BackTrack and Kali Linux, which includes exploits categorized by platform, type, language, port, etc. to help you find the exploit that will work in your particular circumstance. Then, if you feel it will work on your target, you can simply copy and paste it into Kali for your attack.
Must read: An Introduction To Hacker’s OS: Kali Linux Setup Tutorial
Step 1: Fire Up Kali & Open a Browser
Lets start by firing up Kali and opening a browser, such as Iceweasel, the default browser in Kali (EDB can be reached from any browser, in any operating system). If we use the default browser in Kali, we can see that there is a built-in shortcut to the "Exploit-DB" in the browser shortcut bar, as seen below.
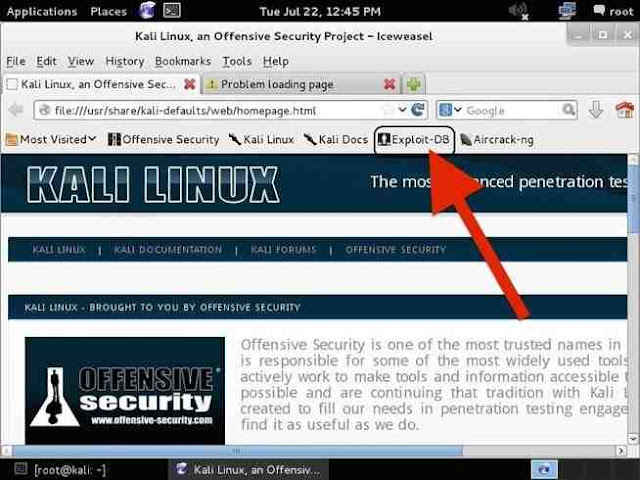
When we click on it, it takes us to the Exploit Database, as seen below.

If you are not using Iceweasel and its built-in shortcut, you can navigate to Exploit-DB by typing www.exploit-db.com in the URL bar.
Step 2: Search the Exploit Database
If we look at the top menu bar in the Exploit Database website, second from the right is a menu item called "Search". When we click on it, it enables us to search the database of exploits and returns a search function screen similar to the screenshot below.
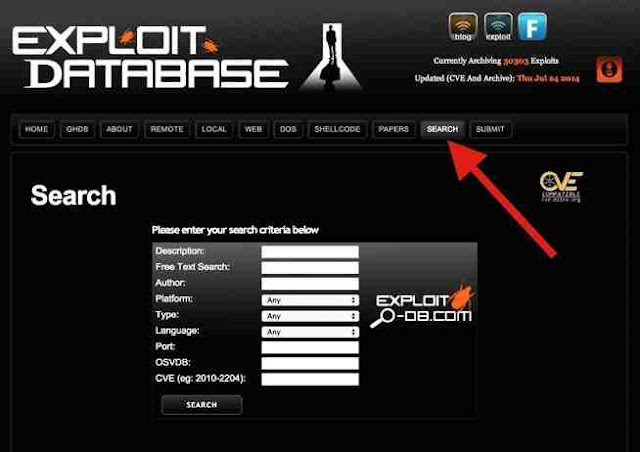
Lets use this search function to find some recent Windows exploits (we are always looking for new Windows exploits, arent we?). In the search function window, we can enter any of the following information;
- Description
- Free Text Search
- Author
- Platform (this is the operating system)
- Type
- Language
- Port
- OSVDB (the Open Source Vulnerability Database)
- CVE (Common Vulnerability and Exploits)
The last two fields can be used if you are specifically looking for an exploit that takes advantage of a known, numbered vulnerability in either of those databases.
In the Platform field, enter "Windows", in the Type field, enter "remote", and in the Free Text Search box, enter "Office". When we do so, the Exploit Database returns a list and a link to all of the exploits that meet those criteria. Of course, you can put in whatever criteria you are searching for. I am only using these as an example.

Step 3: Open an Exploit
From the search results page, we can click on any of the two pages of search results and it will take us to the particular exploit. I clicked on the very first exploit in the list "Internet Explorer TextRange Use-After Free (MS14_012)". When I do so, I am brought to a screen that displays the exploit code like that below. I have circled the description in the code of the exploit.
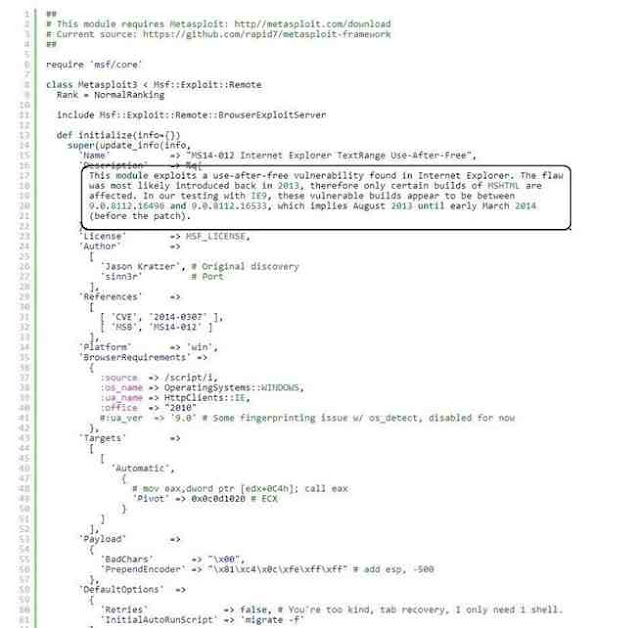
This exploit works against Internet Explorer that was built between August 2013 and March 2014. If you want to use it, you can simply copy and paste this text file and put it into the exploit directory in Metasploit (if you are using an up-to-date version of Metasploit, it is already included). This is a good example of how specific an exploit can be.
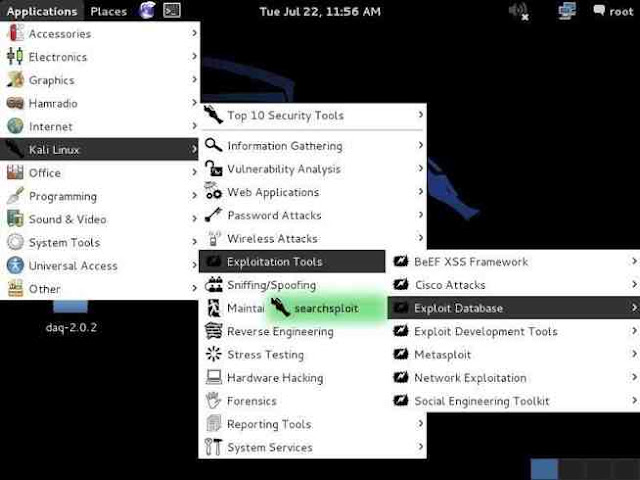
Step 4: Open Up Searchsploit
Kali, having also been developed by Offensive Security, has built into it a local database of exploits based on the same Exploit Database. We can access it by going to Applications -> Kali Linux -> Exploitation Tools -> Exploit Database and clicking on searchsploit as shown below.
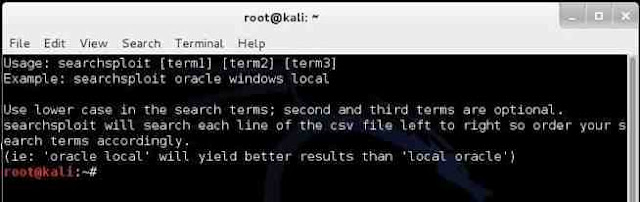
It will open a screen like that below that details the basic syntax on how to use searchsploit. Note that it explains that you must use lowercase search terms and that it searches a CSV (comma separated values) file from left to right, so search term order matters.
Step 5: Search the Exploit Database with Searchsploit
Now that we have opened a terminal for searchsploit, we can now use this tool to search our local copy of the Exploit Database. As you might expect, our local copy of the exploit database is much faster to search, but does NOT have all the updates that the online database does. Despite this, unless we looking for the very latest exploits, the local database works fast and is effective.
One other note on its use. As the information is organized in CSV files, searches locally often will yield results slightly differently than the online database. In the screenshot below, I searched for "Windows" and "Office" and only received a single result, unlike what I received when I used the online database.

Exploit Database is an excellent repository for exploits and other hacks that we might need, including new Google hacks, white papers on security and hacking, denial of service (DOS) attacks, and shellcode that you can use out the box or tailor for your unique attack.
Recommended Articles To Become A Hacker:
How To Become A Hacker - Basic Guide For Beginners 2015
Understand The Hacker Mindset To Become A Real Hacker
Programming Languages For Hackers And Learn It From Most 6 Helpful Websites
Installing Hackers OS Kali Linux In VMware (Beginners Guide With Screenshots)
Easy Steps to Create Web Penetration Testing Lab in Kali Linux
Introduction to using Metasploit in Kali Linux
An Introduction To Hacker’s OS: Kali Linux And Setup Tutorial.
Linux Powerful Distros For Hacking Or Security: Kali, Tails And Qubes
Become A Hacker: What Is Denial of Service (DoS) Attack?
Available link for download
Sunday, April 23, 2017
Kali Linux Tutorial Information Gathering Using TheHarvester
Kali Linux Tutorial Information Gathering Using TheHarvester

Also Read: Practical Tutorial For Best 15 Pentest Tools In Kali Linux 2.0
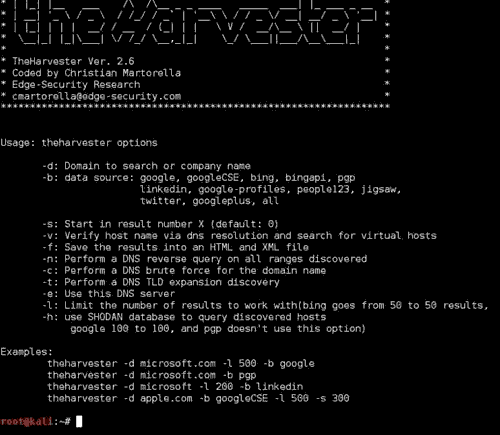
TheHarvester has been developed in Python by Christian Martorella. It is a tool which provides us information about e-mail accounts, user names and hostnames/subdomains from different public sources like search engines and PGP key server.
This tool is designed to help the penetration tester on an earlier stage; it is an effective, simple and easy to use. The sources supported are:
Google – emails, subdomains
Google profiles – Employee names
Bing search – emails, subdomains/hostnames, virtual hosts
Pgp servers – emails, subdomains/hostnames
LinkedIn – Employee names
Exalead – emails, subdomain/hostnames
New features:
- Time delays between requests
- XML results export
- Search a domain in all sources
- Virtual host verifier
Let’s get started,
If you are using Kali Linux, open the terminal and type theharvester
Also Read: An Introduction To Hacker’s OS: Kali Linux Setup Tutorial
If not then it can be easily downloaded from here: https://github.com/laramies/theHarvester
Simply Download and extract it
Provide execute permission to: theHarvester.py by [chmod 755 theHavester.py]
Then simply run ./theharvester
You will see similar to this:
Here I am using kali linux.
Method:1
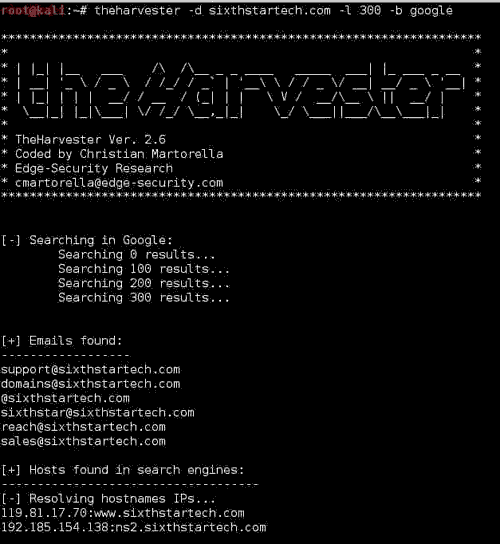
You can simply use the commandtheHarvester -d [url] -l 300 -b [search engine name]
For example: theHarvester -d sixthstartech.com -l 300 -b google
Which will result as in the screenshot below:
Method:2
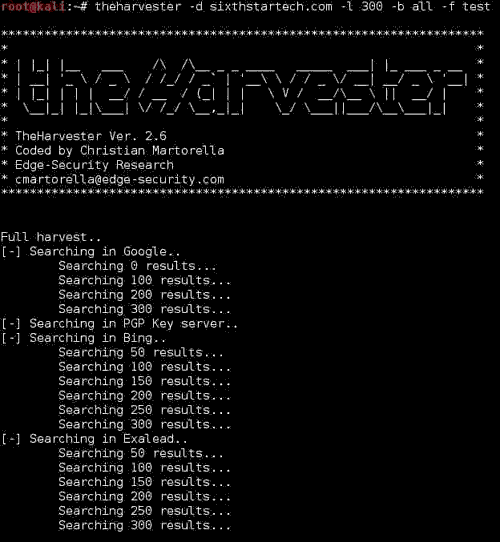
To get all the information about the website u can use the command as:theHarvester -d sixthstartech.com -l 300 -b all
Which will result as:

Method:3
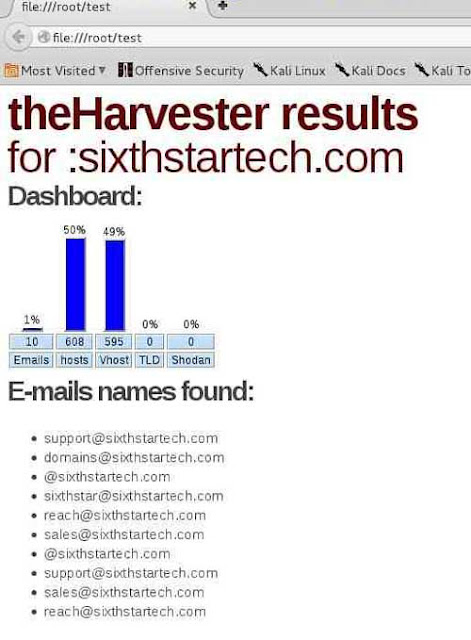
To save the result in HTML file you can use –f option followed by a file name,Example:
theHarvester.py -d sixthstartech.com -l 300 -b all -f test
The result in HTML File:
That’s it and hoped this helped you!!
Thank you.
Also Read:
- Kali Linux Tutorial: Find Vulnerabilities for Any Website Using Nikto
- Improved Features Of New Kali Linux 2.0 And How To Upgrade To It
- How to Setup Nessus in Kali Linux - Most Used Vulnerability Scanner in 2015
Available link for download
Tuesday, April 11, 2017
Kali Linux Tutorial DDoS Attack Using GoldenEye Tool In Kali 2 0 Sana
Kali Linux Tutorial DDoS Attack Using GoldenEye Tool In Kali 2 0 Sana

Today we are going to talk about how to use GoldenEye to perform a ddos attack, if you want learn about ddos attack you just need to read the below recommended article about DDoS , and Here in this tutorial we will use GoldenEye Python based app in kali linux 2.0 as the Operating system.
Recommended:
- Become A Hacker: What Is Denial of Service (DoS) Attack?
- An Introduction To Hacker’s OS: Kali Linux Setup Tutorial
- Improved Features Of New Kali Linux 2.0 And How To Upgrade To It
Disclaimer: This tutorial is for educational purposes only and we are NOT responsible in any way for how this information is used, use it at your own risk.
What is GoldenEye ?
GoldenEye is an python app for SECURITY TESTING PURPOSES ONLY! And he is a HTTP DoS Test Tool.Dowloading GoldenEye :
To Download GoldenEye Go To : https://github.com/jseidl/GoldenEyeOre open your Terminal on KAli Linux 2.0 and follow:
- root@k4linux:~# git clone https://github.com/jseidl/GoldenEye.git
- Cloning into GoldenEye...
- remote: Counting objects: 70, done.
- remote: Total 70 (delta 0), reused 0 (delta 0), pack-reused 70
- Unpacking objects: 100% (70/70), done.
- Checking connectivity... done.
- root@k4linux:~# cd GoldenEye/
- root@k4linux:~/GoldenEye# ls
- goldeneye.py README.md res util
- root@k4linux:~/GoldenEye#
How To Use GoldenEye?
GoldenEye it simple to use after downloading it go to the folder where you saved them.Change the permission and make it executable :
root@k4linux:~/GoldenEye# chmod +x goldeneye.py
And run the script :
root@k4linux:~/GoldenEye# ./goldeneye.py [OPTIONS]
To show all options :
Watch the video tutorial for more explanation (GoldenEye):
If you have encountered a problem or you have any questions or remarks please feel free to set a comment.
root@k4linux:~/GoldenEye# ./goldeneye.py -h
Watch the video tutorial for more explanation (GoldenEye):
If you have encountered a problem or you have any questions or remarks please feel free to set a comment.
Source: http://www.k4linux.com/
Recommended Articles To Become Hacker:
- Become a Hacker: Best 20 Tips for Beginners to Start Learning
- Become a Hacker!, What does Exactly Mean by a Hacker ?
- The Reason Behind Why Hackers Using Linux As Their Primary OS
- Hacker Tips - 10 Common Mistakes You Should Avoid When Coding
- Become A Hacker: Top Books To Learn Ethical Hacking
- What You Should Do To Become A Hacker!
- Python For Hackers And Learn It From Top 5 Web Resources
- Become A Hacker: Types Of Cyber Attacks And Must Know Facts
- Become A Hacker: Learn the Basics of Networking
- Penetration Testing: Basic Guide For Beginners
- Understand The Hacker Mindset To Become A Real Hacker
- Programming Languages For Hackers And Learn It From Most 6 Helpful Websites
- How To Become A Hacker - Basic Guide For Beginners
Available link for download
Thursday, April 6, 2017
Kali Linux Tutorial Find Vulnerabilities for Any Website Using Nikto
Kali Linux Tutorial Find Vulnerabilities for Any Website Using Nikto

In this tutorial im going to explain how to Find Vulnerabilities for Any Website Using Nikto
tool in Kali linux, Before attacking any website, its critical to do good reconnaissance. A few minutes of recon can save you hours on a hack. Simply trying various attacks without first finding which attacks the site is vulnerable is pure foolishness.
Nikto tool is freely available in hackers Os Kali linux,
Kali Linux
First off, you need to have Kali linux (or backtrack) up and running on your machine. Any other Linux distro might work, but youll need to install Nikto on your own.
Now if you dont have Kali Linux installed, you might want to go to this page: An Introduction to Hackers OS Kali Linux and Installation Tutorial
Nikto
There are a number of tools and applications to find vulnerabilities in websites, but one of the simplest (and one of my favorites) is nikto.
This small and simple tool examines a website and reports back to you the potential vulnerabilities that it found that you could use to exploit or hack the site. In addition, its one of the most widely used website vulnerabilities tools in the industry and in many circles considered the industry standard.
Although this tool is extremely useful and effective, it is NOT stealthy. Any website with an IDS or other security measures in place will detect that you are scanning it. Originally designed for security testing, it was never meant to be stealthy.
Step 1: Fire Up Kali & Open Nikto
Lets fire up Kali and get started with nikto. Once we have Kali up and running, go to Kali Linux -> Vulnerability Analysis -> Misc Scanners ->nikto, like in the screenshot below.
Although there are many options in using nikto, we will limit ourselves here to the basic syntax, such as this:
nikto -h <IP or hostname>
Step 2: Scan the Web Server
Lets start with a safe web server on our own network. In this case, I have started the http service on another machine on my network. There is not a website hosted by this machine, just the web server. Lets scan it for vulnerabilities by typing:
nikto -h 192.168.1.104
Nikto responds with a lot of information, as you can see below.
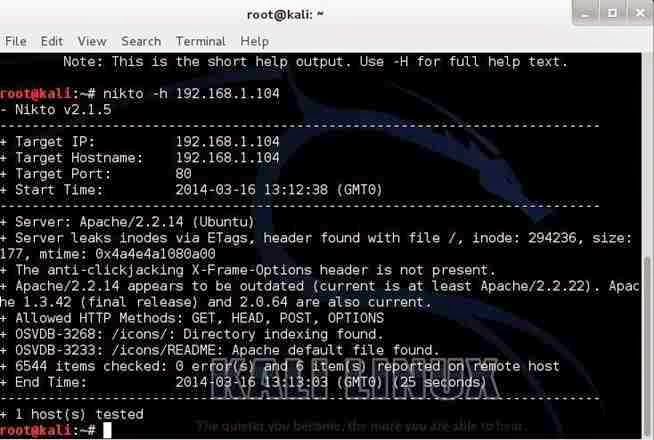
First, it tells us the server is Apache 2.2.14, probably on Ubuntu. It nailed this info and gives up more information on other potential vulnerabilities on this web server.
Note near the bottom that it identifies some vulnerabilities with the OSVDB prefix.
This is the Open Source Vulnerability Database. This is a database maintained of known vulnerabilities at www.osvdb.org, in addition to other databases I covered, such as SecurityFocus and Microsofts Technet.
3: Scan the Site
Lets see what nikto can tell us about this site.
nikto -h webscantest.com
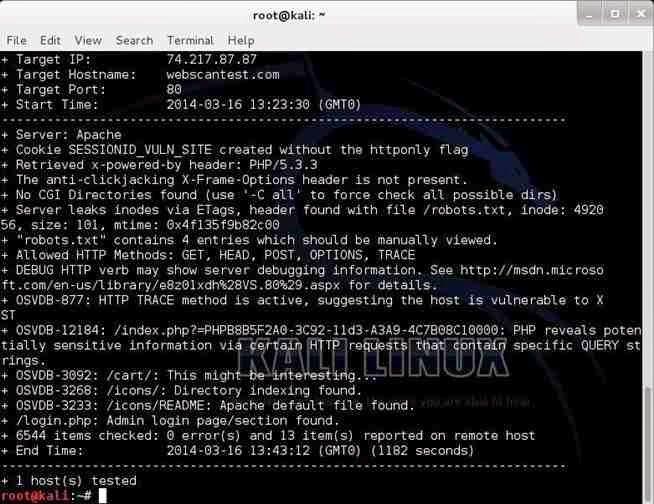
Once again, it identifies the server (Apache) and then proceeds to identify numerous potential vulnerabilities pre-fixed with OSVDB.
We can take a look at that website at www.osvdb.org to learn more about these vulnerabilities.
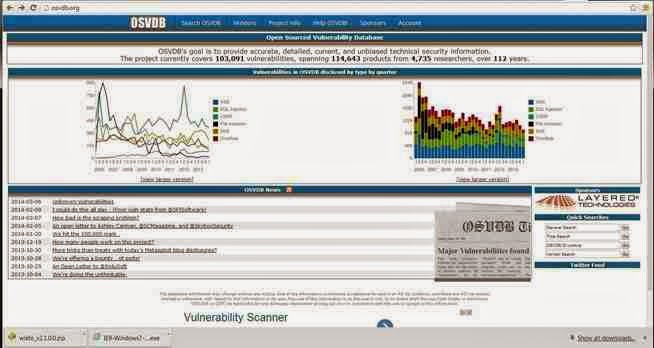
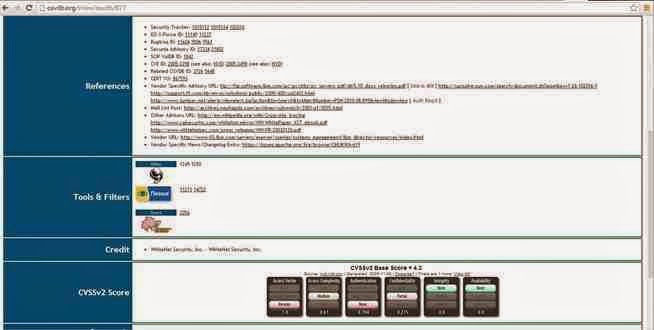
Now, lets use this site to find information on one of the vulnerabilities identified by nikto as OSVDB-877. We can put that reference number into the search function and it retrieves the following page.
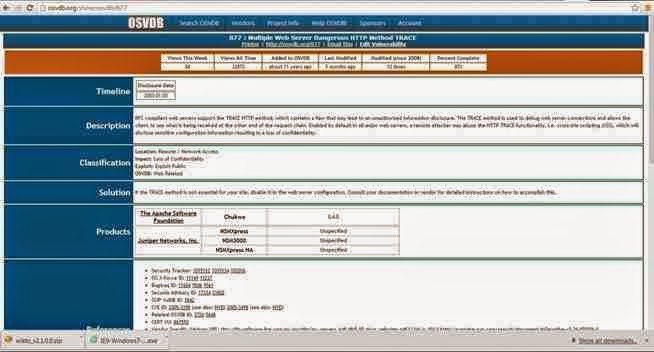
Note, in lower half of this page there are cross-references to the various information sources about this vulnerability, as well as references to tools and filters such as Nikto, Nessus, and Snort.
Scan Facebook
Finally, lets point nikto at www.facebook.com.
nikto -h facebook.com
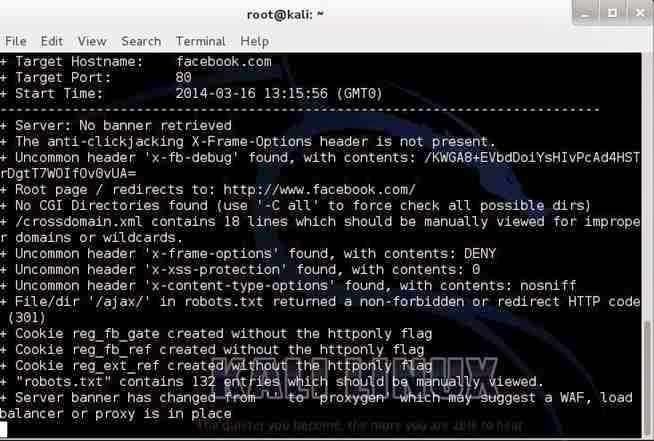
As you can see, Facebook is tightly secured with few vulnerabilities. As you can imagine, if Facebook werent secure, every script-kiddie on the planet would be hacking it to see who his true love is chatting with online.
Read my previous article to hack a website: How to Hack Website Using Sql Map in Kali Linux - Sql Injection
Available link for download
Wednesday, March 8, 2017
Justify using Groovy
Justify using Groovy
How does one justify using Groovy on a project? To me its no different than including any other dependency in my project and in the end it has the same result but with a lot more benefits. There are a lot of skeptics out there, specifically among my team members, and I just cant imagine why they wouldnt want to use Groovy in their every day development. I guess in this instance "knowledge is a curse." Its kind of difficult to explain why I believe in what Groovy is doing, but I will at least give it a try.
First, the biggest initial hurdle people cant get over is they think to start writing Groovy they have to stop writing Java. That couldnt be further from the truth. Groovy was never meant to replace Java. I have used Groovy to write unit tests for my Java code and I have written Groovy code that has used Java code and vic versa. My experience has shown that Groovy and Java just work seamlessly together, especially when using the maven-groovy-plugin and the IntelliJ Idea JetGroovy plugin (for more information see More Groovy Goodies by Joe Kueser).
Secondly, to me the biggest benefit of Groovy, with no cost to the developer, is the hundreds of extra methods added to existing Java classes (see the Groovy JDK). Just by including a new dependency, I have at my disposal hundreds of new time saving methods that I can start using immediately. For example, there are approximately 50 new methods added to java.lang.String (not sure I will ever use all of them but you get the picture). Now lets say for example you were using some open source project like JFreeChart. And you were using version 1.0.8, and 2.0 was out and it included hundreds of new methods. How long would it take you to change the version in your maven2 pom? To me this is not much different than using Groovy to "extend" Java.
Finally, I want to give a quick example of what the end result of a Groovy class is since Groovy is just complied into Java bytecode. Since I have repeatedly stated that Groovy is no different than including a new dependency in your project let me prove it.
Borrowing an example from my previous post, lets say my Groovy class looks something like this:
My next step would be to use the Groovy Complier (groovyc) to compile my Groovy source into Java bytecode (or just use the maven-groovy-plugin). That would produce GroovyFileTest.class. Using a Java decompiler, such as Jad, here is the outcome:class GroovyFileTest {
def void test() {
def file = "/workspace/sandbox/grvyfile/src/test.txt"
println new File(file).text()
}
}
For the sake of clarity I am not including all the other information that was decompiled (well.... because its rather long). But to summarize, my two line Groovy script is convereted to 214 lines of decompiled Java code. Initially you might think that boosts well for Groovy and really shows the benefits of Groovy, but there is a lot of Groovy going on behind the scenes.public void test()
{
Class class1 = GroovyFileTest.class;
Class class2 = groovy.lang.MetaClass.class;
Object file = "/workspace/sandbox/grvyfile/src/test.txt";
ScriptBytecodeAdapter.invokeMethodOnCurrentN(class1,
(GroovyObject)ScriptBytecodeAdapter.castToType(this, groovy.lang.GroovyObject.class),
"println", new Object[] {
ScriptBytecodeAdapter.invokeMethod0(class1,
ScriptBytecodeAdapter.invokeNewN(class1,
java.io.File.class,
((Object) (new Object[] {file}))), "text")});
}
From my perspective this is the only current argument a Groovy skeptic can make: "well look at all that extra junk they are throwing in. Isnt that going to hurt performance?". And at the end it just might. I think its obvious that Groovy bytecode probably wont run as fast as Java bytecode, but for me the benefits out way that disadvantage.

I by no means intended this to be an exhaustive list of Groovy benefits (for that I would recommend reading the excellent but lengthy article by Guillaume Laforge on the recent Groovy 1.5 features) . I just wanted to prove that the end result is no different. Hopefully people will respond with questions and criticisms and I can respond intelligently.
To me Groovy is sort of the legal steroids of programming. Those that use it have an unfair advantage, enabling them to deliver software quicker then their competitors and co-workers.
Available link for download
Sunday, February 26, 2017
Kali Linux Tutorial Using Maltego Tool To Scan Network And Finding IP
Kali Linux Tutorial Using Maltego Tool To Scan Network And Finding IP

Using Maltego in Kali to Recon a Target Network
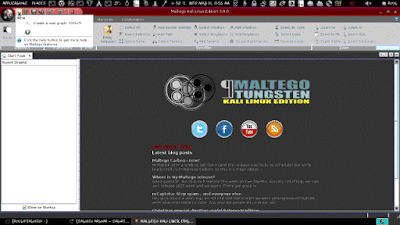
Step 1: Open Maltego & Register
Let’s start by firing up Kali and then opening Maltego. Here is a complete tutorial about hackers OS Kali Linux, so read this before you go ahead: An Introduction To Hacker’s OS: Kali Linux Setup Tutorial
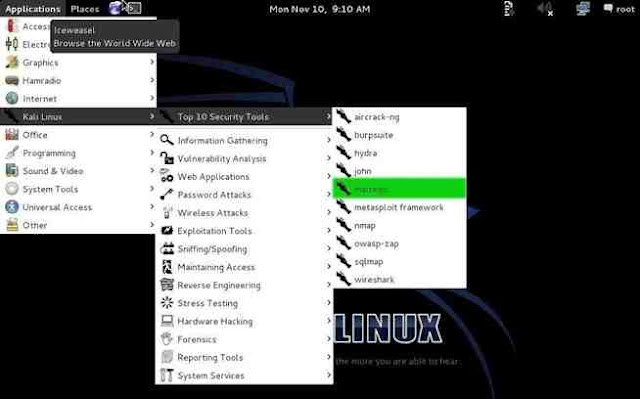
Maltego can be found in numerous places in Kali, but the easiest way to get to it is to go to Applications -> Kali Linux -> Top 10 Security Tools. Then, among the Top 10, you will find Maltego at number 5, as shown in the screenshot below.
When you open Maltego, you will need to wait a brief moment for it to startup. After it finishes loading, you will be greeted by a screen asking you to register Maltego.
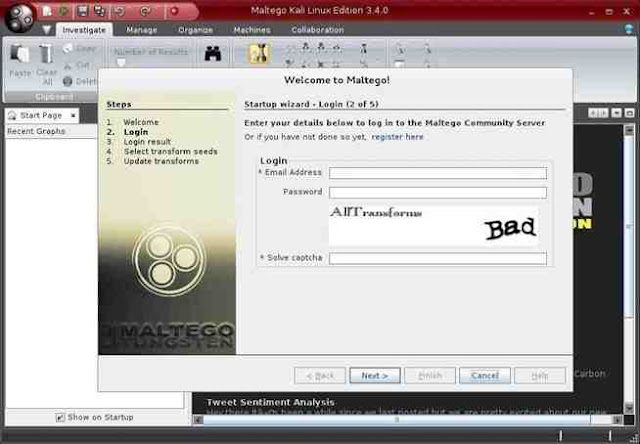
Go ahead and register and save and remember your password as you will need it again the next time you login into Maltego.
Step 2: Choose a Machine & Parameters
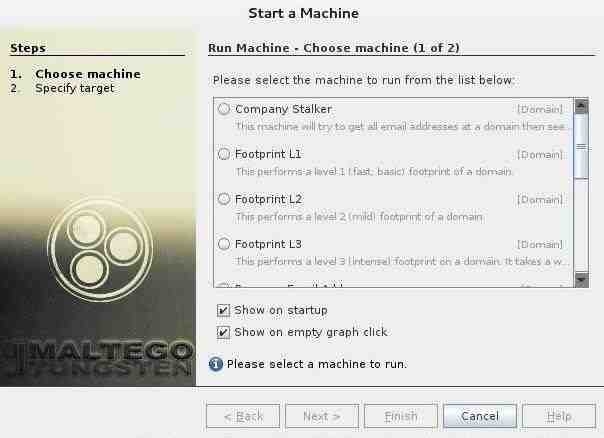
After successfully registering and logging into Maltego, we will have to decide what type of “machine” we want to run against our target. In Maltego’s parlance, a machine is simply what type of footprinting we want to do against our target. Here, we are focusing on the network footprinting, so our choices are:
- Company Stalker (this gathers email information)
- Footprint L1 (basic information gathering)
- Footprint L2 (moderate amount of information gathering)
- Footprint L3 (intense and the most complete information gathering)
Step 3: Choose a Target
Now, that we have chosen a type of machine for our footprinting, we will need to choose a target. Let’s choose our friends at SANS, one of the leading IT security training and consulting firms in the world.
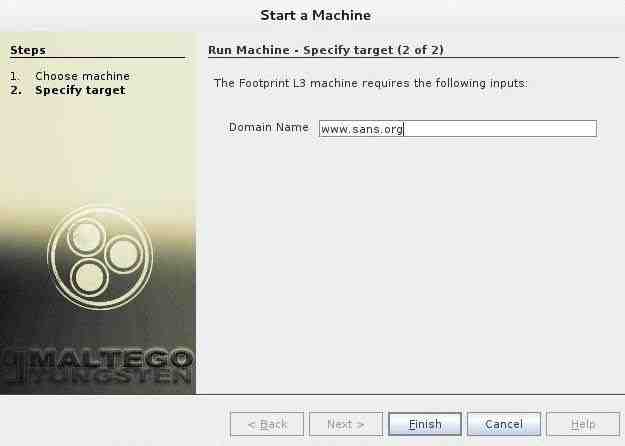
Now, click “Finish” and let Maltego do its work.
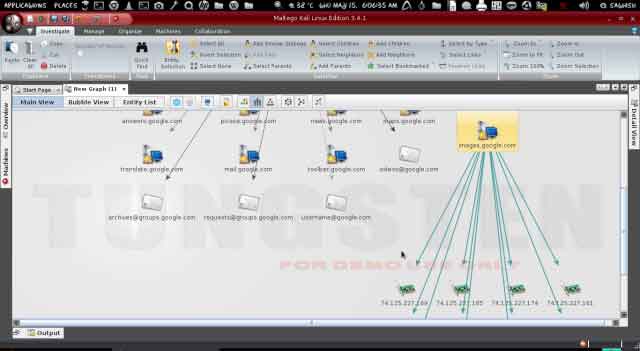
Step 4: Results
Maltego will now begin to gather info on our target domain, sans.org, and display it on screen. In the screenshot below, we can see that Maltego has already collected the email addresses from the site, while it collects the nameservers and mail servers.
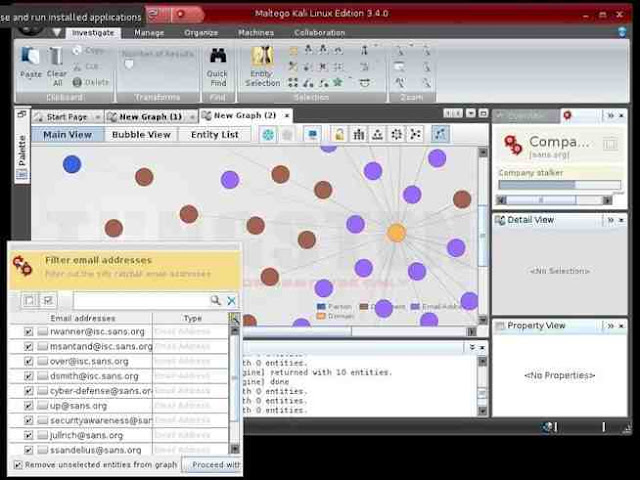
Finally, we can click on “Bubble View” when Maltego is done and see all of the relationships between our target and its subdomains and linked sites.
How to find IP address
By clicking left button of mouse drag the domain in Main view.
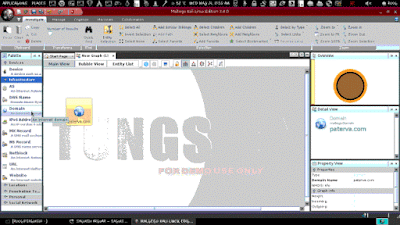
Double click on domain icon and rename it into your target domain. Here I am taking google.com as example.
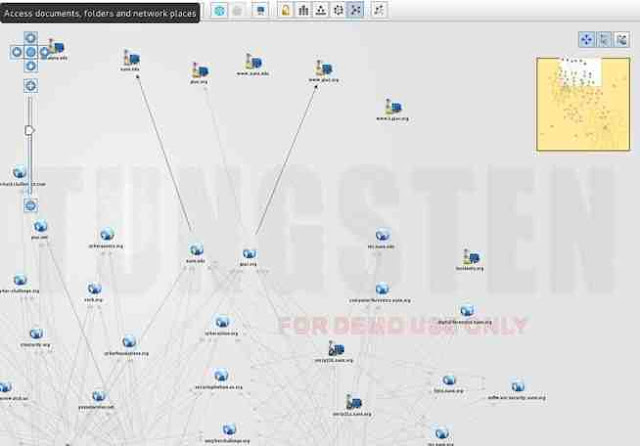
Here we are searching for top level domain for our target domain. First right click on domain then
Run Transform ? All Transforms ? To Domain ( Find other TLDs)

Here we got the result of TLD search.
Now we are to gain more information about these domains. First of all select all domains by dragging left mouse button or you can select one by one press Shift + left click.
After selecting all domains, right click one of them and then
Run Transform ? All Transforms ? To Website (Quick-Lookup)
Here we are going to search all website which are associate with these domains.
Well here we are just replacing the a website icon I have targeted http://www.google.com for more info follow the image. This is not a necessary part but you should learn it.
Here we are going to find the IP address of our target website. Right click on target website then
Run Transform ? Resolve to IP ? To IP Address (DNS)
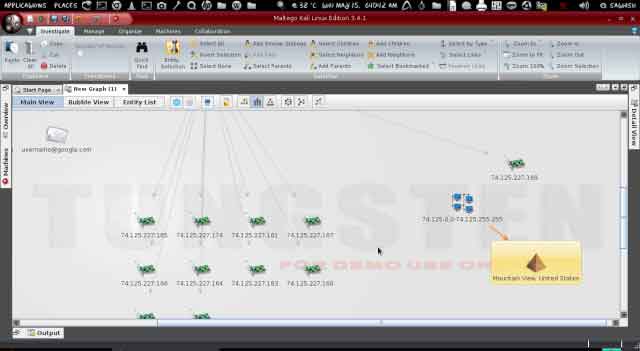
Here we got the IP address of our target website and the detail of where its located.
Conclusion
Maltego is an excellent tool to do network recon on our potential target, enabling us to do numerous types of recon in a single scan with a single tool. Maltego is also capable of doing individual recon, but we will leave that for my next Maltego article, see you my grey hats.Recommended Kali Linux Tutorials
- Kali Linux Tutorial: Hack A Web Browser Using BeEF
- Kali Linux Tutorial: How To Perform Evil Twin Wireless Access
- Kali Linux Tutorial: Hack a Website login Page Password Using Wireshark
- Kali Linux Tutorial: Finding Exploits Using the Searchsploit Tool
Available link for download
Tuesday, February 21, 2017
Kali Linux Tutorial Hack A Web Browser Using BeEF
Kali Linux Tutorial Hack A Web Browser Using BeEF

Step 1: Start Cooking BeEF
BeEF is built into Kali Linux, and it can be started as a service and accessed via a web browser on your localhost.
Here is a complete tutorial about hackers OS Kali Linux, so read this before you go ahead: An Introduction To Hacker’s OS: Kali Linux Setup Tutorial
So let’s start by firing up Kali and cooking a bit of BeEF. Start the BeEF service by going to “Applications” -> “Kali Linux” -> “System Services” -> “BeEF” -> “beef start.”

Step 2: Opening a Browser to BeEF
The BeEF server can be accessed via any browser on our localhost (127.0.0.1) web server at port 3000. To access its authentication page, go to:
http://localhost:3000/ui/authentication
The default credentials are “beef” for both username and password.

Great! Now you have successfully logged into BeEF and are ready to begin using this powerful platform to hack web browsers.
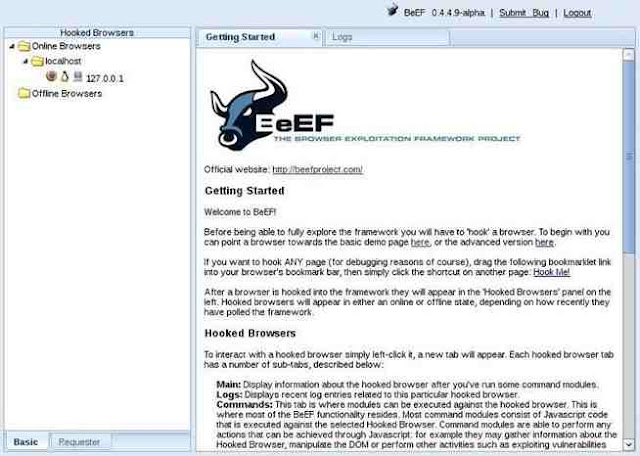
Note that in the screenshot below that my local browser, 127.0.0.1, appears in the left hand “Hooked Browsers” explorer after I clicked on the link to the demo page. BeEF also displays its “Getting Started” window to the right.
Note that in the screenshot below that my local browser, 127.0.0.1, appears in the left hand “Hooked Browsers” explorer after I clicked on the link to the demo page. BeEF also displays its “Getting Started” window to the right.
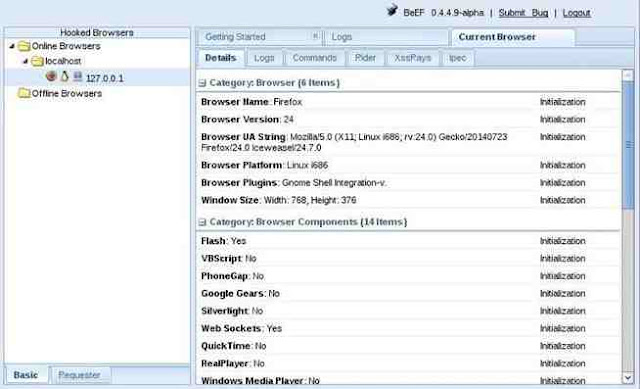
Step 3: Viewing Browser Details
If I click on the local browser, it will provide with more choices to the right including a “Details” window where we can get all the particulars of that browser. Since I am using the Iceweasel browser built into Kali, which is built upon Firefox, it shows me that the browser is Firefox.
It also shows me the version number (24), the platform (Linux i686), any components (Flash, web sockets, etc.), and more information that we will be able to use in later web application hacks.
Step 4: Hooking a Browser
The key to success with BeEF is to “hook” a browser. This basically means that we need the victim to visit a vulnerable web app. This injected code in the “hooked” browser then responds to commands from the BeEF server. From there, we can do a number of malicious things on the victim’s computer.
BeEF has a JavaScript file called “hook.js,” and if we can get the victim to execute it in a vulnerable web app, we will hook their browser! In future tutorials, we will look at multiple ways to get the victim’s browser hooked.
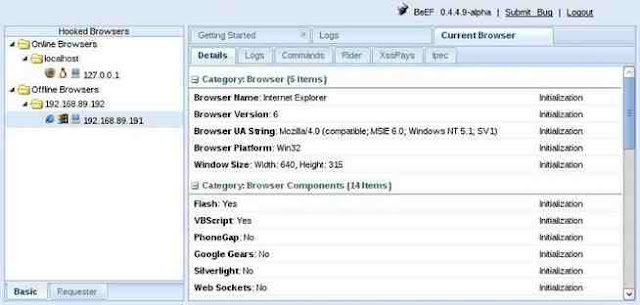
In the screenshot below, I have “hooked” an Internet Explorer 6 browser on an old Windows XP on my LAN at IP 192.168.89.191.
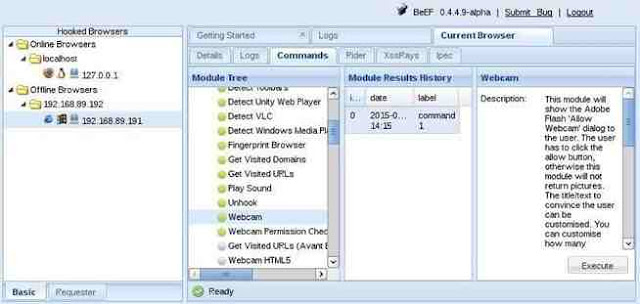
Step 5: Running Commands in the Browser
Now, that we have hooked the victim’s browser, we can use numerous built-in commands that can executed from the victim’s browser. Below are just a few examples; there are many others.
- Get Visited Domains
- Get Visited URLs
- Webcam
- Get All Cookies
- Grab Google Contacts
- Screenshot
In the screenshot below, I selected the “Webcam” command that many of you may be interested in. As you can see, when I execute this command, an Adobe Flash dialog box will pop up on the screen of the user asking, “Allow Webcam?” If they click “Allow,” it will begin to return pictures from the victim’s machine to you.
Of course, the text can be customized, so be imaginative. For instance, you could customize the button to say “You have just won the lottery! Click here to collect your winnings!” or “Your software is out of date. Click here to update and keep your computer secure.” Other such messages might entice the victim to click on the box.
Step 6: Getting Cookies
Once we have the browser hooked, there is almost unlimited possibilities of what we can do. If we wanted the cookies of the victim, we can go to “Chrome Extensions” and select “Get All Cookies” as shown in the screenshot below.

When we click on the “Execute” button to the bottom right, it will begin collecting all the cookies from the browser. Obviously, once you have the user’s cookies, you are likely to have access to their websites as well.
BeEF is an extraordinary and powerful tool for exploiting web browsers. In addition to what I have shown you here, it can also be used to leverage operating system attacks. We will be using it and other tools in my new series on hacking web applications, mobile devices, and Facebook, so keep coming back, my greenhorn hackers.
Recommended Articles To Become A Hacker:
How To Become A Hacker - Basic Guide For Beginners 2015
Understand The Hacker Mindset To Become A Real Hacker
Programming Languages For Hackers And Learn It From Most 6 Helpful Websites
Installing Hackers OS Kali Linux In VMware (Beginners Guide With Screenshots)
Easy Steps to Create Web Penetration Testing Lab in Kali Linux
Introduction to using Metasploit in Kali Linux
An Introduction To Hacker’s OS: Kali Linux And Setup Tutorial.
Linux Powerful Distros For Hacking Or Security: Kali, Tails And Qubes
Become A Hacker: What Is Denial of Service (DoS) Attack?
Available link for download
Subscribe to:
Posts (Atom)