Showing posts with label kali. Show all posts
Showing posts with label kali. Show all posts
Tuesday, July 18, 2017
Kali Linux Tutorial Find IP Address Of Any Website And Trace Its Location
Kali Linux Tutorial Find IP Address Of Any Website And Trace Its Location

Welcome back hackers, after a short break today i am here to share with you a new kali tutorial to find the ip address of any website and trace its exact location, i know there is a lot of tutorials to find location of ip address but all of them are really sucks, means they only give us only country details or sometimes shows random places for an ip, and if you want to know the exact location of a website then you need a search warrant but here i will demonstrate you how to find the ip address of any website and how to know its exact location without any search warrant or subpoena.
IP address, hope you all know what is IP. In this tutorial first we need to find the ip address of website in order to trace the location, without ip there is no way to find the location so for this purpose we will use Maltego information gathering tool and it is pre-installed in our favorite Kali Linux.
Maltego is popular information gathering tool but it will not show us the exact place of website, so we will use MaxMind database to find the location. MaxMind is company maintaining a database of the locations of every ip address in the world and their location status includes GPS coordinates, area code, zip code and country. MaxMind software is little expensive but the good news is they are also providing a free developers version of this database without any softwares or tools to read it.
Pygeoip, is a small python script we are also using in this tutorial. It is developed by two programmers named Jennifer Ennis and T.Williams and it is released under GPL license that enables us to input an ip address and output this critical information.
How to find the ip address with maltego
Maltego, is an open source intelligence and forensics application. This is a GUI tool so looks different. Maltego is an information gathering tool that allows you to visually see relationships and it focuses on providing a library of transforms for discovery of data from open sources, and visualizing that information in a graph format, suitable for link analysis and data mining.Maltego allows you to enumerate network and domain information like Domain Names, Whois Information, DNS Names, Netblocks, IP Addresses etc
Maltego also allows you to enumerate People information like:
- Email addresses associated with a person’s name
- Web sites associated with a person’s name
- Phone numbers associated with a person’s name
- Social groups that are associated with a person’s name
- Companies and organizations associated with a person’s name etc
I have already published a tutorial for information gathering with maltego, so i would like to recommend you to read this article to find the IP address of website which you want to know the location: Kali Linux Tutorial: Using Maltego Tool To Scan Network And Finding IP
If you are new to kali linux then i recommend you to read my older post about kali linux and will guide you through the installation process and also it will also teach you the kali basics: An Introduction To Hacker’s OS: Kali Linux Setup Tutorial
Tracing the exact location of website
Step 1: Boot Kali Linux and open up a terminal
First of all run our favorite Kali system and open up a new terminal.If you are new to kali linux then i recommend you to read my older post about kali linux and will guide you through the installation process and also it will also teach you the kali basics: An Introduction To Hacker’s OS: Kali Linux Setup Tutorial
Step 2: Download MaxMind database
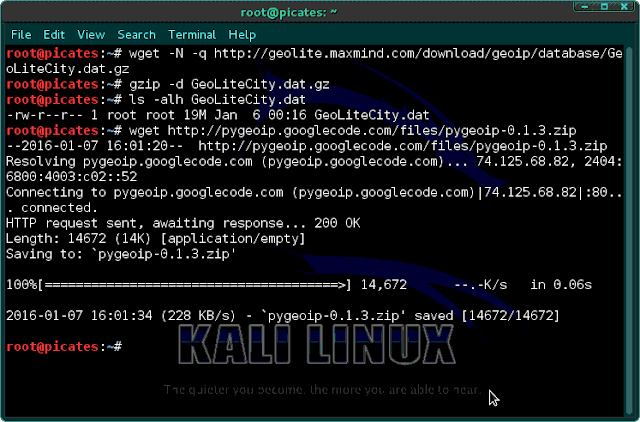
Now we need to download the database from MaxMind, and we can get it by typing the following.wget -N -q http://geolite.maxmind.com/download/geoip/database/GeoLiteCity.dat.gz

Then we need to unzip it.
gzip -d GeoLiteCity.dat.gz
Lets now check that the database is in place by listing the directory.
ls -alh GeoLiteCity.dat

Step 3: Download & Install Pygeoip
Next, we need to install the Python script to read the database, pygeoip. We can download it by typing the following.wget http://pygeoip.googlecode.com/files/pygeoip-0.1.3.zip
Then, unzip it.
unzip pygeoip-0.1.3.zip

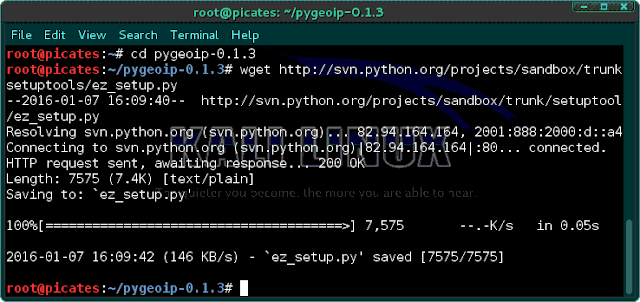
We next need to download some setup tools into the pygeoip directory.
cd pygeoip-0.1.3
wget http://svn.python.org/projects/sandbox/trunk/setuptools/ez_setup.py
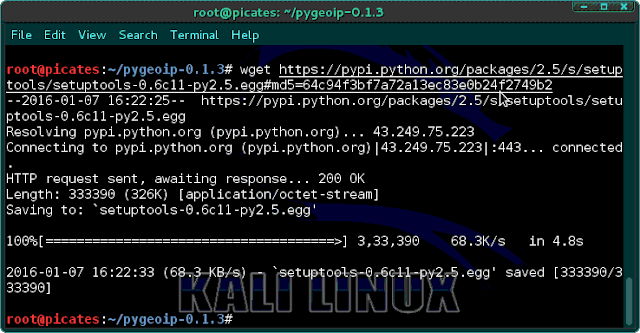
Now type following:
wget https://pypi.python.org/packages/2.5/s/setuptools/setuptools-0.6c11-py2.5.egg#md5=64c94f3bf7a72a13ec83e0b24f2749b2
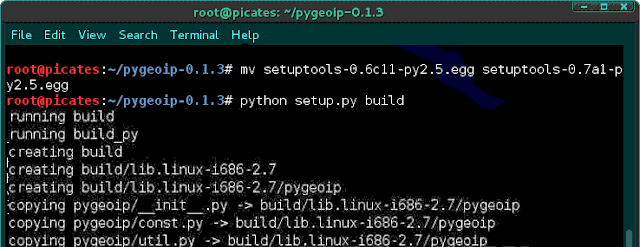
Lets now move and then build and install the setup tools.
mv setuptools-0.6c11-py2.5.egg setuptools-0.7a1-py2.5.egg
python setup.py build
Next type:
python setup.py install
We need to move the database to the pygeoip directory so that script can access it without having to use the full path.
cd
mv GeoLiteCity.dat /pygeoip-0.1.3
Step 4: Query the Database
Now that we have the database in place and the pygeoip script downloaded and installed, we can begin to query that database with pygeoip.First, we need to start a Python shell.
python
Then, you will be greeted will the triple >>> indicating you are now in an interactive python shell. Lets import the module and instantiate the class.
>>> import pygeoip>>> gip = pygeopip.GeoIP(GeoLiteCity.dat)
Next, we are ready to begin our query. Lets see where Google is located.
>>> rec = gip.record_by_addr(64.233.161.99)
>>> for key,val in rec.items():
... print "%s: %s" %(key,val)
...
Please note that it is critical to indent the "print". If not, you will throw an error.

As you can see, we were able to locate Googles IP in Mountain View, CA at area code 650, postal code 94043, longitude -122.0574, and latitude 37.4192. Not bad!.
Once again, the combination of the database and pygeoip script was able to provide us with key location information on CNNs IP address.
This little tool is great for locating any IP address in the world, albeit, it is a bit clunky. Maybe someone here in the Null Byte community with good Python skills would like to write an interactive script with a nice user interface where the user can simply enter the IP and get the record information?. Thank you, if you have any doubts please type down a comment.
Also Read:
- How to Setup Nessus in Kali Linux - Most Used Vulnerability Scanner in 2015
- How To Bypass Antivirus Detection Using Veil-Evasion In Kali Linux
- Kali Linux Tools: Brief Introduction To 10 Powerful Hacking Tools
Available link for download
Saturday, July 15, 2017
Kali Linux Tutorial How To Brute Force Wordpress Using Wpscan Tool
Kali Linux Tutorial How To Brute Force Wordpress Using Wpscan Tool

As a WordPress administrator or webmaster you are responsible for the security of the WordPress blog or website you manage. Most probably you’ve already done a lot to beef up the security and today we will show you how to brute force Wordpress password in Kali Linux using Wpscan to checking your Password Strength.
Disclaimer: This tutorial is for educational purposes only and we are NOT responsible in any way for how this information is used, use it at your own risk.
As we now WPScan is a black box WordPress vulnerability scanner, and it is installed by default in kali linux we will use it for brute forcing wordpress, If you have no idea about Kali Linux then i recommend you to read this article: An Introduction To Hacker’s OS: Kali Linux Setup Tutorial.
We will use our wordpress platform that we already installed in our kali linux. If you have not already done visit our article: Complete Guide To Setup Wordpress In Kali Linux With Xampp Server .
Letss start,
- Open your Kali Linux Terminal and start Xampp server by typing the following command:
root@kali: /opt/lampp/lampp start
- Now we need to Enumerate users, type in terminal:
root@kali: wpscan -u 127.0.0.1/wordpress --enumerate u

- Wpscan will automatically search the admin username.

- Now Do wordlist password brute force on the username, type in terminal:
root@kali: wpscan --url 127.0.0.1/wordpress --wordlist /root/pass --username k4linux

- --wordlist set the location of your Password Wordlist
- --username set the administrator username that you have found
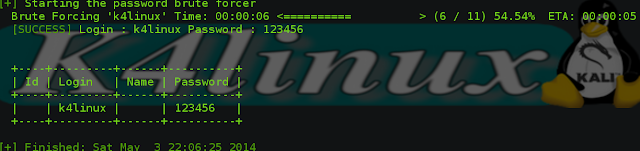
After a search Wpscan will find the password and this will take a few minutes, this depends on your Wordlist.
Efficiency of the Brute Force depend on how much strong is your wordlist and how many password contains it.
Watch the video tutorial for more explanation (Wpscan):
Credits: http://www.k4linux.com/
Recommended Hacking Tutorial:
- How to Hack Website Using Sql Map in Kali Linux - Sql Injection
- Kali Linux Tutorial: Find Vulnerabilities for Any Website Using Nikto
- Heartbleed Attack: Exploiting OpenSSL Vulnerability Using Metasploit
- Kali Linux Tutorial: Hack a Website login Page Password Using Wireshark
Available link for download
Kali Linux Tutorial How To Use Doona Bruteforce Exploit Detector Tool BED
Kali Linux Tutorial How To Use Doona Bruteforce Exploit Detector Tool BED

Doona is a fork of the Bruteforce Exploit Detector Tool (BED). BED is a program which is designed to check daemons for potential buffer overflows, format string bugs etc.
Doona is Australian for duvet. It adds a significant number of features/changes to BED. (Defination Kali.org)
If you haven’t install Doona just simply follow Commands:-
Apt-get updateApt-get install doona
How to use doona:-
1. Type “doona” and you will get option like show in figure below:-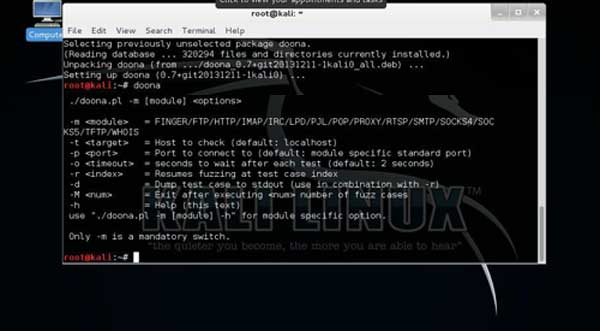 |
doona |
2. Then you need an target ip mine is “216.58.210.238” i ping google see in below shot:-
 |
Target ip |
3. Then you need to enter whole command for attack
Command:- doona -m http -t <target ip> -p <target port> -M 10 (max not after exit)
This is my command :- doona -m http -t 216.58.210.238 -M 10
 |
Command |
DOONA USAGE EXAMPLE
Use the HTTP plugin (-m HTTP) to fuzz the target (-t 192.168.1.15), stopping after 5 cases (-M 5):root@kali:~# doona -m HTTP -t 192.168.1.15 -M 5Doona 0.7 by Wireghoul (www.justanotherhacker.com) based on BED by mjm and snakebyte+ Buffer overflow testing
1/37 [XAXAX] ……
Max requests (5) completed, index: 5
Also Read:
- Easy Way To Crack Password Using John The Ripper In Kali Linux
- Practical Tutorial For Best 15 Pentest Tools In Kali Linux 2.0
- Kali Linux Tutorial: Finding Exploits Using the Searchsploit Tool
Available link for download
Thursday, June 29, 2017
Kali Linux Tutorial How To Perform Evil Twin Wireless Access
Kali Linux Tutorial How To Perform Evil Twin Wireless Access

Prerequisites
- Kali Linux (An Introduction To Hacker’s OS: Kali Linux Setup Tutorial)
- Prior experience with wireless hacking (Kali Linux Tutorial: Wireless Auditing with Aircrack-ng, Reaver, and Pixiewps)

You will also need to install a tool (bridge utils) which doesnt come pre-installed in Kali. No big deal-
apt-get install bridge-utils
Objectives
The whole process can be broken down into the following steps-
- Finding out about the access point (AP) you want to imitate, and then actually imitating it (i.e. creating another access point with the same SSID and everything). Well use airmon-ng for finding necessary info about the network, and airbase-ng to create its twin.
- Forcing the client to disconnect from the real AP and connecting to yours. Well use aireplay-ng to deauthenticate the client, and strong signal strength to make it connect to our network.
- Making sure the client doesnt notice that he connected to a fake AP. That basically means that we have to provide internet access to our client after he has connected to the fake wireless network. For that we will need to have internet access ourselves, which can be routed to out client.
- Have fun - monitor traffic from the client, maybe hack into his computer using metasploit.
PS: The first 3 are primary objectives, the last one is optional and not a part of evil twin attack as such. It is rather a man in the middle attack. Picture credits : firewalls.com
Recommended To Read: How To Hack Wi-Fi WPA/WPA2 With Kali Linux
Information Gathering - airmon-ng
To see available wireless interfaces-
iwconfig

To start monitor mode on the available wireless interface (say wlan0)-
airmon-ng start wlan0To capture packets from the air on monitor mode interface (mon0)
airodump-ng mon0After about 30-40 seconds, press ctrl+c and leave the terminal as is. Open a new terminal.


Creating the twin
Now we will use airbase-ng to create the twin network of one of the networks that showed up in the airodump-ng list. Remember, you need to have a client connected to the network (this client will be forced to disconnect from that network and connect to ours), so choose the network accordingly. Now after you have selected the network, take a note of its ESSID and BSSID. Replace them in given code-
airbase-ng -a <BSSID here> --essid <ESSID here> -c <channel here> <interface name>If you face any problems, a shorter code will be-
airbase-ng --essid <name of network> mon0Remove the angular brackets (< & >) and choose any channel that you want. Also, the BSSID can be randomly selected too, and doesnt have to match with the target. The interface would be mon0 (or whatever is the card you want to use) . The only thing identical about the twins has to be their ESSIDs (which is the name of the network). However, it is better to keep all parameters same to make it look more real. After you are done entering the parameters and running the command, youll see that airbase turned your wireless adapter into an access point.

Note : We will need to provide internet access to our client at a later stage. Make sure you have a method of connecting to the net other than wireless internet, because your card will be busy acting like an AP, and wont be able to provide you with internet connectivity. So, either you need another card, or broadband/ADSL/3G/4G/2G internet.
Telling the client to get lost
 |
| Man in the middle attack : Pic Credits: owasp.net |
I suggest you to read my previous tutorial before you go ahead: Man In The Middle Attack Using Ettercap In Kali Linux
Now we have to ask the client to disconnect from that AP. Our twin wont work if the client is connected to the other network. We need to force it to disconnect from the real network and connect to the twin.
For this, the first part is to force it to disconnect. Aireplay will do that for us-
aireplay-ng --deauth 0 -a <BSSID> mon0 --ignore-negative-one

The 0 species the time internal at which to send the deauth request. 0 means extremely fast, 1 would mean send a packet every 1 seconds, 2 would mean a packet every 2 seconds, and so on. If you keep it as 0, then your client would be disconnected in a matter of seconds, so fire up the command, and press ctrl+c after a few seconds only. Note that the deauth is sent on broadcast, so all the clients (not just one) connected to the network will disconnect. Disconnecting a specific client is also possible.
Not the real one, but why the fake one
- Physically move closer to the client.
- Power up your wireless card to transmit at more power.
iwconfig wlan0 txpower 27Here 27 is the transmission power in dBm. Some cards cant transmit at high power, and some can transmit at extremely high power. Alfa cards usually support upto 30dBm, but many countries dont allow the card to transmit at such powers. Try changing 27 to 30 and youll see what I mean. In Bolivia, however, you can transmit at 30dBm, and by changing the regulatory domain, we can overcome the power limitation.
iw reg set BO
iwconfig wlan0 txpower 30It is strongly advised to not break laws as the transmission limits are there for a reason, and very high power can be harmful to health (I have no experimental evidence). Nevertheless, the client should connect to you if your signal strength is stronger than that you the real twin.
Note : If you are unable to get your client to connect to you, there is another option. You can leave him with no options. If you keep transmitting the deauth packets continuously (i.e. dont press ctrl+c after the client has disconnected), he will have no choice but to connect to you. However, this is quite an unstable situation, and the client will go back to the real twin as soon as it gets the chance.
Give the fake AP internet access
Now we need to provide internet access to the fake AP. This can be done in various ways. In this tutorial, we will consider that we have an interface x0 which has internet connectivity. Now, if you are connected to net via wireless, replace x0 with wlan1 or wlan0, a 3G modem will show up as ppp0. Nevertheless, you just have to know which interface is providing you with internet, and you can route the internet access to your client.
Interfaces
- x0 - This has internet access
- at0 - This is create by airbase-ng (wired face of the wireless access point). If you can somehow give internet access to at0, then the clients connected to your fake wireless network can connect to the net.
- evil - This is an interface that we will create, whose job will be to actually bridge the networks.
Creating evil
We will use Bridge control utility provided by Kali, brctl. Execute the following code-
brctl addbr evilThis will create the bridge. Now we have to specify which two interfaces have to be bridged-
brctl addif evil x0
brctl addif evil at0We can assign an IP to the interfaces and bring them up using-
ifconfig x0 0.0.0.0 up
ifconfig at0 0.0.0.0 upAlso bring up the evil interface (the interfaces arent always up by default so we have to do this many times)
ifconfig evil upNow to auto configure all the complicated DHCP settings, well use dhclient
dhclient3 evil &Finally, all the configurations have been completed. You can execute ifconfig and see the results, which will show you all the interfaces you have created.
Officially, the evil twin attack is complete. The client is now connected to your fake network, and can use the internet pretty easily. He will not have any way to find out what went wrong. However, the last objective remains.
Have fun
Now that the client is using the internet via our evil interface, we can do some evil stuff. This actually comes under a Man In The Middle attack (MITM), and Ill write a detailed tutorial for it later. However, for the time being, I will give you some idea what you can do.
Sniffing using Wireshark
Now all the packets that go from the user to the internet pass through out evil interface, and these packets can be monitored via wireshark. Recently i have written an article about how to use wireshark, it may help you to monitoring those packets: Kali Linux Tutorial: Hack a Website login Page Password Using Wireshark
Credits:
http://www.kalitutorials.net/
Available link for download
Wednesday, June 14, 2017
Kali Linux Tutorial Introduction To Parsero Vulnerability Analysis Tool
Kali Linux Tutorial Introduction To Parsero Vulnerability Analysis Tool
Parsero is a free script written in Python which reads the Robots.txt file of a web server and looks at the Disallow entries. The Disallow entries tell the search engines what directories or files hosted on a web server mustn’t be indexed. For example, “Disallow: /portal/login” means that the content on www.example.com/portal/login it’s not allowed to be indexed by crawlers like Google, Bing, Yahoo… This is the way the administrator have to not share sensitive or private information with the search engines.
But sometimes these paths typed in the Disallows entries are directly accessible by the users without using a search engine, just visiting the URL and the Path, and sometimes they are not available to be visited by anybody… Because it is really common that the administrators write a lot of Disallows and some of them are available and some of them are not, you can use Parsero in order to check the HTTP status code of each Disallow entry in order to check automatically if these directories are available or not.
Also, the fact the administrator write a robots.txt, it doesn’t mean that the files or directories typed in the Dissallow entries will not be indexed by Bing, Google, Yahoo… For this reason, Parsero is capable of searching in Bing to locate content indexed without the web administrator authorization. Parsero will check the HTTP status code in the same way for each Bing result.
- Recommended: An Introduction To Hacker’s OS: Kali Linux Setup Tutorial
TOOLS INCLUDED IN THE PARSERO PACKAGE:-
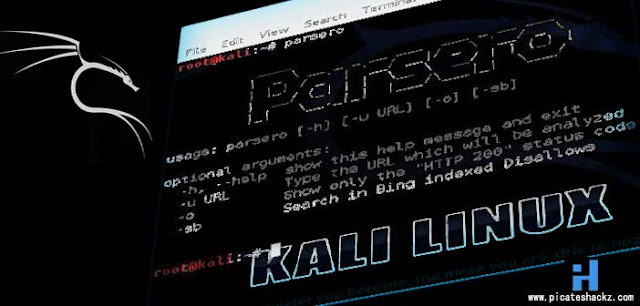
Open up a terminal in Kali Linux and type following command:root@kali:~# parsero -h

PARSERO USAGE EXAMPLE:-
root@kali:~# parsero -u www.bing.com -sb____
| _ __ _ _ __ ___ ___ _ __ ___
| |_) / _` | ‘__/ __|/ _ ‘__/ _
| __/ (_| | | __ __/ | | (_) |
|_| __,_|_| |___/___|_| ___/Starting Parsero v0.75 (https://github.com/behindthefirewalls/Parsero) at 06/09/14 12:48:25
Parsero scan report for www.bing.com
http://www.bing.com/travel/secure 301 Moved Permanently
http://www.bing.com/travel/flight/flightSearchAction 301 Moved Permanently
http://www.bing.com/travel/css 301 Moved Permanently
http://www.bing.com/results 404 Not Found
http://www.bing.com/spbasic 404 Not Found
http://www.bing.com/entities/search 302 Found
http://www.bing.com/translator/? 200 OK
http://www.bing.com/Proxy.ashx 404 Not Found
http://www.bing.com/images/search? 200 OK
http://www.bing.com/travel/hotel/hotelSearch 301 Moved Permanently
http://www.bing.com/static/ 404 Not Found
http://www.bing.com/offers/proxy/dealsserver/api/log 405 Method Not Allowed
http://www.bing.com/shenghuo 301 Moved Permanently
http://www.bing.com/widget/render 200 OK
Also Read:
- Kali Linux Tutorial: Find IP Address Of Any Website And Trace Its Location
- Kali Linux Tutorial: Information Gathering Using TheHarvester
- Kali Linux Tutorial: Using Maltego Tool To Scan Network And Finding IP
Available link for download
Kali Linux Tutorial Introduction To SAKIS3G Hardware Hacking
Kali Linux Tutorial Introduction To SAKIS3G Hardware Hacking
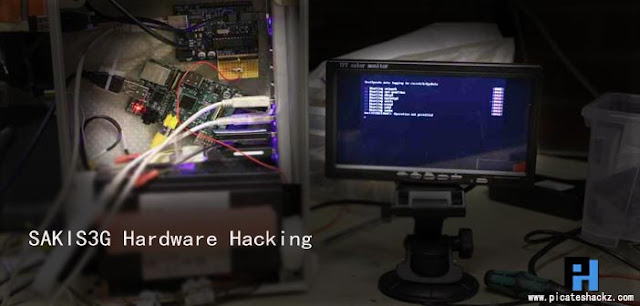
Sakis3G is a tweaked shell script which is supposed to work out-of-the-box for establishing a 3G connection with any combination of modem or operator. It automagically setups your USB or Bluetooth™ modem, and may even detect operator settings. You should try it when anything else fails.
Recommended: An Introduction To Hacker’s OS: Kali Linux And Setup Tutorial.
TOOLS INCLUDED IN THE SAKIS3G PACKAGE
root@kali:~# sakis3g help
Sakis 3G All-in-one script – Version 0.2.0e
(c) Sakis Dimopoulos 2009, 2010 under GNU GPL v2Usage:
sakis3g [actors] [switches] [variables]Sakis3G is a shell script which is supposed to work out-of-the-box for
establishing a 3G connection with any combination of modem or operator.NOTE: This script requires root priviledges to properly work. If not executed from root, it will try to acquire them.Common actors are:connect – Attempts to establish 3G connection.
disconnect – Stops all active PPP connections.
toggle – Attempts to establish 3G connection. If already connected, it
disconnects instead.
reconnect – Attempts to establish 3G connection. If already connected, it
first disconnects and then attempts.
start – Same as connect. Provided for use as init.d script.
stop – Same as disconnect. Provided for use as init.d script.
reload – Same as reconnect. Provided for use as init.d script.
force-reload – Same as reload. Provided for use as init.d script.
restart – Same as reload. Provided for use as init.d script.
desktop – Creates desktop shortcut for this script.
status – Prints connection status and exits. Exit code is 0 if
connected, or 6 if not connected.
help – Prints this screen and exits.
man – Displays man page.NOTE: For more information, you should consult man page or official Sakis3G
wiki, available at:
http://wiki.sakis3g.org/
SAKIS3G USAGE EXAMPLE
root@kali:~# sakis3g –interactive “connect”
Video TUTORIAL
Also Read:
- Programming Languages For Hackers And Learn It From Most 6 Helpful Websites
- Installing Hackers OS Kali Linux In VMware (Beginners Guide With Screenshots)
- Easy Steps to Create Web Penetration Testing Lab in Kali Linux
Available link for download
Tuesday, June 13, 2017
Kali Linux Tutorial Hack Your Own Network and Beef Up Its Security
Kali Linux Tutorial Hack Your Own Network and Beef Up Its Security

Kali Linux is packed with a ton of software for testing security holes in your network. There are far too many to list here, but were so enamored with it that we decided to pick a few of our favorite tools and show how they work: Aircrack, Airbase, and ARPspoof. Well show you how to crack a Wi-Fi password with brute force techniques, create a fake router to trick machines into logging into it, and perform a man in the middle attack to eavesdrop on network communications. Remember: use these powers for good, not for evil. Knowing how to do these things can get you out of a jam or help you learn to secure your own network, but doing them to someone else is not something we recommend.
Read my previous article to know more about Kali Linux: An Introduction To Hacker’s OS: Kali Linux And Setup Tutorial.
Crack a WPA Wi-Fi Password with Aircrack

Kali Linux comes with a whole suite of apps for cracking Wi-Fi networks, including Aircrack and Reaver—both of which weve mentioned before for cracking WEP and WPA passwords, respectively.
Recommend to read: How To Hack Wi-Fi WPA/WPA2 With Kali Linux
However, WEP passwords arent that popular anymore (because theyre so easy to crack), and Reaver only works if a network has WPS enabled. So today, were going take another look at Aircrack and use it to to brute force our way into a WPA network (with the help of a password list).
Step One: Configure Your Wireless Card

First things first: disconnect from all wireless networks. Then open up terminal. In order to use Aircrack, youll need a wireless card that supports injections. Type this into the Terminal to make sure your card supports it:
airmon-ngThis lists all the wireless cards that support this crack. If you card doesnt support injections, it wont show up here. Yours is likely listed under interface as wlan0, but it may depend on your machine.
Next, type in:
airmon-ng start wlan0Replace
wlan0 with your cards interface address. You should get a message back saying that monitor mode was enabled.Step Two: Monitor Your Network

Next, youre going to get a list of all the networks in your area and monitor yours.
Type in:
airodump-ng mon0Youll see all the networks in your area. Locate your network from the list, and copy the BSSID, while making a note of the channel its on. Tap Ctrl+C to stop the process.
Next, type this in, replacing the information in parentheses with the information you gathered above:
airodump-ng -c (channel) --bssid (bssid) -w /root/Desktop/ (monitor interface)It should read something like this:
airodump-ng -c 6 --bssid 04:1E:64:98:96:AB -w /root/Desktop/ mon0Now, youll be monitoring your network. You should see four files pop up on the desktop. Dont worry about those now; youll need one of them later. The next step is a bit of a waiting game, as youll be sitting around waiting for a device to connect to a network. In this case, just open up a device you own and connect to your Wi-Fi. You should see it pop up as a new station. Make a note of the station number, because youll need that in the next step.
Step Three: Capture a Handshake

Now, youre going to force a reconnect so you can capture the handshake between the computer and the router. Leave Airodump running and open up a new tab in Terminal. Then type in:
aireplay-ng -0 2 -a (router bssid) -c (client station number) mon0It should look something like:
aireplay-ng -0 2 -a 04:1E:64:98:96:AB -c 54:4E:85:46:78:EA mon0Youll now see Aireplay send packets to your computer to force a reconnect. Hop back over to the Airodump tab and youll see a new number listed after WPA Handshake. If thats there, youve successfully grabbed the handshake and you can start cracking the password.
Step Four: Crack the Password

You now have the routers password in encrypted form, but you still need to actually figure out what it is. To do this, youll use a password list to try and brute force your way into the network. You can find these lists online, but Kali Linux includes a few small lists to get you started in the /usr/share/wordlists directory, so well just use one of those. To start cracking the password type this in:
aircrack-ng -a2 -b (router bssid) -w (path to wordlist) /Root/Desktop/*.capSo, continuing with our above example and using one of the built-in wordlists, it should read something like:
aircrack-ng -a2 -b 04:1E:64:98:96:AB -w /usr/share/wordlists/fern-wifi/common.txt /Root/Desktop/*.capNow, Aircrack will try all of those passwords to see if one fits. If it does, youll get a message saying the key was found with the password. If not, give another one of the password lists a try until you find one that works. The bigger the password list, the longer this process will take, but the greater chance you have of succeeding.
How to Use This Information to Stay Safe
So, you just brute forced your way into your own network. Depending on how good your password is, it either took you five minutes or five hours. If your password is something simple, like "password123", then chances are one of the smaller wordlists was able to crack it pretty quickly. If it was more complicated, it probably took a long time or never surfaced the password at all (if so: good for you!).
The best protection here is a good, strong password on your router. The longer, weirder, and more complex it is, the better. Likewise, make sure youre using the WPA2 security protocol and you dont have WPS enabled.
Create a Fake Network with Airbase

Next up, lets take a look at how you can spoof a network address to trick people into signing into the wrong network so you can watch what theyre doing. Hackers might do this so you sign into the fake network thinking its your real one, then performing a man in the middle attack (more on that in the next section) to gather information about you from your traffic. This is amazingly easy to do with a tool in Kali Linux called Airbase.
Essentially, youll turn your Wi-Fi adapter on Kali Linux into an access point with the same name as another network. In order to do this, youll follow the same line of research as you did above, but the endings a bit different.
Step One: Configure Your Wireless Card
Just like last time, you need to set up your wireless card to monitor traffic. Open up Terminal and type:
airmon-ngThis lists all the wireless cards that support this crack. Yours is likely listed under interface as wlan0.
Next, type in:
airmon-ng start wlan0Now youre in monitor mode. Its time to find the network you want to spoof.
Step Two: Find a Wi-Fi Network to Spoof

In order to spoof a router, youll need some information about it. So, type in:
airodump-ng mon0Available link for download
Read more »
Subscribe to:
Posts (Atom)